The most common blunder when the topic of a computer virus arises is that people will often refer to a Worm or Trojan Horse as a Virus. While the words Trojan, worm, and virus are used interchangeably, they are not the same. Viruses, worms, and Trojan Horses are all malicious programs that can cause damage to your computer, but there are differences between the three, and knowing those differences can help you to better protect your computer from their often damaging effects.
A computer Virus attaches itself to a program or file so it can spread from one computer to another, leaving infections as it travels. Some viruses cause only mildly annoying effects while others can damage your hardware, software, or files. Almost all viruses are attached to an executable file, which means the virus may exist on your computer but it cannot infect your computer unless you run or open the malicious program. It is important to note that a virus cannot be spread without a human action, (such as running an infected program) to keep it going. People continue the spread of a computer virus, mostly unknowingly, by sharing infecting files or sending e-mails with viruses as attachments in the e-mail.
A Worm is similar to a virus by its design, and is considered to be a sub-class of a virus. Worms spread from computer to computer, but unlike a virus, it has the ability to travel without any help from a person. A worm takes advantage of file or information transport features on your system, which allows it to travel unaided. The biggest danger with a worm is its ability to replicate itself on your system, so rather than your computer sending out a single worm, it could send out hundreds or thousands of copies of itself, creating a huge devastating effect. One example would be for a worm to send a copy of itself to everyone listed in your e-mail address book. Then, the worm replicates and sends itself out to everyone listed in each of the receiver's address book, and the manifest continues on down the line. Due to the copying nature of a worm and its ability to travel across networks the end result in most cases is that the worm consumes too much system memory (or network bandwidth), causing Web servers, network servers, and individual computers to stop responding. In more recent worm attacks such as the much talked about Blaster Worm, the worm has been designed to tunnel into your system and allow malicious users to control your computer remotely.
A Trojan Horse is full of as much trickery as the mythological Trojan Horse it was named after. The Trojan Horse, at first glance will appear to be useful software but will actually do damage once installed or run on your computer. Those on the receiving end of a Trojan Horse are usually tricked into opening them because they appear to be receiving legitimate software or files from a legitimate source. The Trojan horse itself would typically be a Windows executable program file, and thus must have an executable filename extension such as .exe, .com, .scr, .bat, or .pif. Since Windows is sometimes configured by default to hide filename extensions from a user, the Trojan horse is an extension that might be "masked" by giving it a name such as 'Readme.txt. exe'. With file extensions hidden, the user would only see 'Readme.txt' and could mistake it for a harmless text file. When the recipient double-clicks on the attachment, the Trojan horse might superficially do what the user expects it to do (open a text file, for example), so as to keep the victim unaware of its real, concealed, objectives. Meanwhile, it might discreetly modify or delete files, change the configuration of the computer, or even use the computer as a base from which to attack local or other networks - possibly joining many other similarly infected computers as part of a distributed denial-of-service attack. When a Trojan is activated on your computer, the results can vary. Some Trojans are designed to be more annoying than malicious (like changing your desktop, adding silly active desktop icons) or they can cause serious damage by deleting files and destroying information on your system. Trojans are also known to create a backdoor on your computer that gives malicious users access to your system, possibly allowing confidential or personal information to be compromised. Unlike viruses and worms, Trojans do not reproduce by infecting other files nor do they self-replicate.
Added into the mix, what is called a blended threat? A blended threat is a sophisticated attack that bundles some of the worst aspects of viruses, worms, Trojan horses and malicious code into one threat. Blended threats use server and Internet vulnerabilities to initiate, transmit and spread an attack. This combination of method and techniques means blended threats can spread quickly and cause widespread damage. Characteristics of blended threats include: causes harm, propagates by multiple methods, attacks from multiple points and exploits vulnerabilities.
To be considered a blended thread, the attack would normally serve to transport multiple attacks in one payload. For examplem it wouldn't just launch a DoS attack — it would also install a backdoor and damage a local system in one shot. Additionally, blended threats are designed to use multiple modes of transport. For example, a worm may travel through e-mail, but a single blended threat could use multiple routes such as e-mail, IRC and file-sharing sharing networks. The actual attack itself is also not limited to a specific act. For example, rather than a specific attack on predetermined .exe files, a blended thread could modify exe files, HTML files and registry keys at the same time — basically it can cause damage within several areas of your network at one time.
Blended threats are considered to be the worst risk to security since the inception of viruses, as most blended threats require no human intervention to propagate.
Combating Viruses, Worms and Trojan Horses :
The first steps to protect your computer are to ensure your operating system (OS) is up-to-date. This is essential if you are running a Microsoft Windows OS. Secondly, you should have anti-virus software installed on your system and download updates frequently to ensure your software has the latest fixes for new viruses, worms, and Trojan Horses. Additionally you want to make sure your anti-virus program has the ability to scan e-mail and files as they are downloaded from the Internet. This will help prevent malicious programs from even reaching your computer. If this isn't enough protection, then you may want to consider installing a firewall as well.
A firewall is a system which prevents unauthorized use and access to your computer. A firewall can be either hardware or software. Hardware firewalls provide a strong degree of protection from most forms of attack coming from the outside world and can be purchased as a stand-alone product or in broadband routers. Unfortunately, when battling viruses, worms and Trojans, a hardware firewall may be less effective than a software firewall, as it could possibly ignore embedded worms in out going e-mails and see this as regular network traffic. For individual home users, the most popular firewall choice is a software firewall. A good software firewall will protect your computer from outside attempts to control or gain access your computer, and usually provides additional protection against the most common Trojan programs or e-mail worms. The downside to software firewalls is that they will only protect the computer they are installed on, not a network.
It is important to remember that on its own a firewall is unable to get rid of your computer virus problems, but when used in conjunction with regular operating system updates and a good anti-virus scanning software, it will add some extra security and protection for your computer or network.
Tuesday, March 3, 2009

Thursday, January 22, 2009
Spam Report
Spam Evolution: November 2008
Spam in mail traffic

Spam on the Russian Internet in November 2008
The closure of US hosting provider McColo, which hosted the command and control centers of a number of large botnets, resulted in a sharp decline in the amount of spam in November. However, the decline was short-lived and within a few days botnet activity had resumed (e.g. spam made up 83.4% of mail traffic on 16 November, close to the maximum figure for the month).
The graph shows several peaks and troughs mid-month following the closing down of McColo on 13 November. The first of them coincided with www.theregister.co.uk renewed botnet activity on 15-16 November when McColo made use of its backup arrangement with the Swedish ISP TeliaSonera AB. Less than two days later, TeliaSonera AB cut off McColo’s access resulting in a fall in the amount of spam on 17-18 November. A subsequent increase in the amount of spam on 25 November can be linked to an attempt by the operators of the Srizbi botnet to transfer www.pcworld.com their command and control centers to the Tallinn-based Starline Web Services.
The closure of McColo had a clear effect on the volume of spam in November. Spam accounted for 73.7% of mail traffic on the Russian Internet in November, compared to 79.9% in October. A monthly low of 50.5% was recorded on 13 November, two days after the hosting provider was shut down.
Spam by category
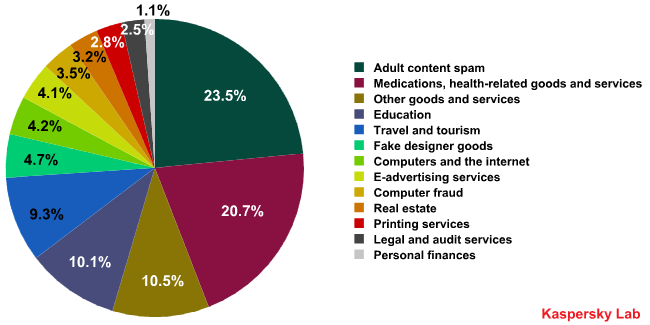
- Adult content spam – 24%
- Medications, health-related goods and services – 21%
- Education – 10%
- Travel and tourism – 9%
- Fake designer goods – 5%
The amount of Medications, health-related goods and services spam rose significantly from 12.5% in October to 21% in November. The Fake designer goods category replaced Spammer services in fifth place. There were no other changes to the top five categories: Education remained in third place and Travel and tourism in fourth (mainly due to offers relating to the upcoming winter holiday season).
Spammers on politics and the economy
The promotion of various goods and services in November purportedly originated from spammers’ desire to help users weather the global economic storm.
One mass mailing contained links to a lengthy article on how to avoid losing money during the crisis. The spammers’ aim became clear towards the end of the article which expounded the financial benefits of investing in a building project on the Black Sea coast.
Spammers exploited the US presidential elections less than the economic downturn, but some mass mailings did reference the elections, with the winner’s name being used to advertize services. One advert for a seminar in Ukraine proudly announced that “Barack Obama trusts professionals!”
Some English-language mass mailings also offered users the opportunity to purchase coins issued in honor of the new president.

Warning – fake!
The amount of Computer fraud spam rose compared to last month, averaging 3% in November against 2.2% in October.
Scam messages purportedly sent by the popular email service Mail.Ru were among the tricks used. Such messages asked recipients to send an SMS to a premium number either in order to win a lottery or to prevent their accounts from being hacked.
Users also received messages allegedly sent by the SMSexpress payment system demanding compensation for “breach of contract”.
Sometimes it may not be clear if an email is genuine or fake. In order to resolve such issues, open the company’s site by typing the address into the browser (not by clicking on a link in a message) and contact the administrator using the contact details given on the site.
Spammer tricks
In November, spammers used a new technique to disguise contact information: the address of the site being advertized was presented in a vertical column. Spammers seemed to think this would make it more difficult to block spam messages, but it also meant that recipients had to memorize the address and type it into the browser in order to view the site.
| Hello, Who do you consider to be the embodiment of style? You can be too: You’ll look 100%, spending less than everybody else Have a nice day! |  |
Another tactic was the use of HTML tags to mask key words. The names of the goods being advertized were put in a table intermingled with random symbols in a less legible font. These pale random symbols alter the way the text is perceived by spam filters but the names of the goods can still be clearly seen by recipients.

Conclusion
Autumn has not been easy for the spammers. In addition to the worsening economic situation, November saw the closure of the hosting provider McColo, which was used to as the command and control center for a number of botnets. The fact that the amount of spam on the Russian Internet fell by two thirds immediately after McColo was shut down suggests that the US provider was widely used by spammers targeting the .ru domain with their mass mailings.
Next month there are likely to be changes in the type of spam being distributed. With the holiday season approaching, adult content messages will probably be displaced by messages advertising party services and fake designer goods.
Recent trends- With the closure of McColo, whose servers hosted the control centers for a number of botnets, the amount of spam in mail traffic fell 7.2% compared to October and averaged 73.7%.
- Malicious files were attached to 2.28% of all emails, 0.2% more than in October.
- Links to phishing sites were found in 0.76% of all emails.
- Graphical spam amounted to 9%.
- Fraudulent emails increased by 0.8% to 3%.
- Spam offering fake designer goods re-entered the top five leading spam categories.
- In order to ensure messages evade spam filters, spammers modified their use of HTML formatting.
Disclaimer: - These are the reports taken from the Kaspersky virus report
Friday, January 9, 2009
How Hard Disk Recovery Works
How does Hard Drive Recovery work?
Hard drives, like all mechanical devices, eventually break down or some of them are caused some of the Hard DIsk will crashed because of the Manufactures itself. Here are some basic possible errors.
Common hard drive problems include:
* User errors
* Software errors
* Hard drive electronics failures
* Hard drive arm failures
* Hard drive platter failures
User Errors
User errors include accidentally deleting or overwriting files (these overwriting files can't be recovered) and accidentally formatting a or deleting a partition.
User errors can sometimes be resolved through the use of off-the-shelf data recovery software.
Software Errors
Software errors usually result from software writing data to the wrong part of the disk.
Errors cause by software are generally much more difficult for off-the-shelf data recovery software to correct. This task may require the services of a data recovery specialist. Some software can crash your Hard Disk because of the basic system requirements of the systems. So read carefully before you install the Software (For Exp. The Anti Virus Software)
Hard Drive Electronics Failures
When a hard drive physically fails, sometimes the mechanical parts of the hard drive remain undamaged. This can happen, for example, if the hard drive is subject to a power surge or a discharge of static electricity.
In these cases, it is usually possible to take the mechanical parts out of the hard drive assembly and place them into another identical hard drive unit. This should be done in a clean-room environment, to prevent dust from damaging the hard drive.
Hard Drive Arm Failures
Hard drive arm failures are very common. When the hard drive arm fails, there is a very good chance that it will damage the hard drive platters.
When you hear the clicking noises from your hard drive which signal a hard drive arm failure, back up all necessary data immediately and power the system down as soon as possible.
If the hard drive platters have not been damaged, a data recovery specialist may still be able to recover data from a hard drive with a damaged hard drive arm.
Hard Drive Platter Failures
No drive platter is manufactured perfectly. There will always be some bad spots on the platter surface. Modern hard drives automatically mark those bad spots as unusable and do not store data there.
Sometimes bad spots will develop during the life of the hard drive. The hard drive will mark that spot bad and attempt to move the data to a good spot on the hard drive. This may, or may not, result in the loss of some data.
Serious hard drive platter failures can occur as a result of hard drive arm failures. In these cases, the hard drive platters are being scratched. Your data is being scratched right off the surface of the platters! You can often hear this damage occuring. These failures are very expensive or impossible to recover.
The Solution to Hard Drive Recovery: Backup
The best method of hard drive recovery is to throw away the failed hard drive and restore your data from backup to a brand new drive.
Backing up your data is a critically important preventative maintenance task. Don't put yourself at risk by not properly backing up your data.
So the best way to escape from the crash is to Backup your weekly processes.
Disclaimer:- What written above is my personal experience. Please forgive me if it hurts anyone.
Hard drives, like all mechanical devices, eventually break down or some of them are caused some of the Hard DIsk will crashed because of the Manufactures itself. Here are some basic possible errors.
Common hard drive problems include:
* User errors
* Software errors
* Hard drive electronics failures
* Hard drive arm failures
* Hard drive platter failures
User Errors
User errors include accidentally deleting or overwriting files (these overwriting files can't be recovered) and accidentally formatting a or deleting a partition.
User errors can sometimes be resolved through the use of off-the-shelf data recovery software.
Software Errors
Software errors usually result from software writing data to the wrong part of the disk.
Errors cause by software are generally much more difficult for off-the-shelf data recovery software to correct. This task may require the services of a data recovery specialist. Some software can crash your Hard Disk because of the basic system requirements of the systems. So read carefully before you install the Software (For Exp. The Anti Virus Software)
Hard Drive Electronics Failures
When a hard drive physically fails, sometimes the mechanical parts of the hard drive remain undamaged. This can happen, for example, if the hard drive is subject to a power surge or a discharge of static electricity.
In these cases, it is usually possible to take the mechanical parts out of the hard drive assembly and place them into another identical hard drive unit. This should be done in a clean-room environment, to prevent dust from damaging the hard drive.
Hard Drive Arm Failures
Hard drive arm failures are very common. When the hard drive arm fails, there is a very good chance that it will damage the hard drive platters.
When you hear the clicking noises from your hard drive which signal a hard drive arm failure, back up all necessary data immediately and power the system down as soon as possible.
If the hard drive platters have not been damaged, a data recovery specialist may still be able to recover data from a hard drive with a damaged hard drive arm.
Hard Drive Platter Failures
No drive platter is manufactured perfectly. There will always be some bad spots on the platter surface. Modern hard drives automatically mark those bad spots as unusable and do not store data there.
Sometimes bad spots will develop during the life of the hard drive. The hard drive will mark that spot bad and attempt to move the data to a good spot on the hard drive. This may, or may not, result in the loss of some data.
Serious hard drive platter failures can occur as a result of hard drive arm failures. In these cases, the hard drive platters are being scratched. Your data is being scratched right off the surface of the platters! You can often hear this damage occuring. These failures are very expensive or impossible to recover.
The Solution to Hard Drive Recovery: Backup
The best method of hard drive recovery is to throw away the failed hard drive and restore your data from backup to a brand new drive.
Backing up your data is a critically important preventative maintenance task. Don't put yourself at risk by not properly backing up your data.
So the best way to escape from the crash is to Backup your weekly processes.
Disclaimer:- What written above is my personal experience. Please forgive me if it hurts anyone.
Wednesday, January 7, 2009
Tips to Speed up the PC
Follow
These tips and you will definitely have a much faster and more reliable PC! Most of the below tips works for windows XP.
1. Wallpapers: They slow your whole system down, so if you're willing to compromise, have a basic plain one instead!
2. Drivers: Update your hardware drivers as frequently as possible. New drivers tend to increase system speed especially in the case of graphics cards, their drivers are updated by the manufacturer very frequently!
3. Minimizing: If you want to use several programs at the same time then minimize those you are not using. This helps reduce the overload on RAM.
4. Boot Faster: The 'starting Windows 95/98' message on startup can delay your booting for a couple of seconds. To get rid of this message go to c:\ and find the file Msdos.sys. Remove the Read-Only option. Next, open it in Notepad or any other text editor. Finally, go to the text 'Options' within the file and make the following changes: Add BootDelay=0. To make your booting even faster, set add Logo=0 to remove the Windows logo at startup.
5.. Restart only Windows: When restarting your PC, hold down Shift to only restart Windows rather than the whole system which will only take a fraction of the time.
6. Turn Off Animations: Go to Display Settings from the Control Panel and switch to the Effects Tab. Now turn off Show Windows Content While Dragging and Smooth Edges on Screen Fonts. This tip is also helpful with Windows XP because of the various fade/scroll effects.
7. Faster Start-Menu Access: Go to the Start menu and select Run. Now type Regedit and hit Enter. The Registry Editor will appear on the screen. Now, open the folder HKEY_CURRENT_ USER\Control Panel\Desktop. You should see a MenuShowDelay value. If you don't then do the following: right click on a blank space in the right pane and select New\String. Change the name in the new value to MenuShowDelay. Now that we have the MenuShowDelay value, double click on it and enter 0 in the value data field. This sets the start menu delay to 0 milliseconds.
8. Resolutions: If you are willing to do anything for faster performance from your PC, then try lowering your display resolution. The lower it is, the faster your PC.
9. Turn off Active Desktop: Go to your Display Properties and switch to the Web tab. Uncheck View My Active Desktop As a Web Page. Since the Active Desktop option under Windows 98 uses a lot of system resources, this option can have a dramatic effect on the speed of the whole system.
10. Defragment Often: Windows 98's Defrag tool uses Application Acceleration from Intel which means that when you defragment your drive, data is physically arranged on the drive so that applications will load faster.
11. Take your PC to Bed: Using the Advanced Power Management feature under Windows 98 gives you the option to use the sleep command. That way, you can send your PC to sleep instead of shutting it down and then restarting it. It's as simple as pressing a button and then pressing the same button to wake it up. You can tell Windows after how many minutes/hours of inactivity to automatically sleep the machine in the Advanced Power Management section of the Control Panel.
12. Faster Internet Access: If you use the Internet for reference and the sites you visit are rarely updated then try the following. In IE (the same can be done in Netscape) go to Tools, Internet Options. Next, click on Settings... In the Temporary Internet Files section. Finally, select Never for the first option and double the amount of storage space to use, click OK!
13. Benchmarking: Benchmarking can be very useful when run frequently. It can tell you how your PC's components are performing and then compare them to other machines like yours. For example, when you overclock your PC, you want to know how much more speed you have and whether it is stable. All this and more can be discovered using benchmarking. An excellent piece of software for doing this job is SiSoft Sandra which can be found in the Downloads File Archive!
14. Refresh the Taskbar without restarting: If you in some way change the taskbar, either in Regedit or elsewhere, you can refresh the task bar without restarting. Hold down Ctrl Alt Del, and double click on Explorer. Say Yes to close Explorer, but no to closing Windows. This will refresh the Taskbar and system tray.
15. Quick CD Eject: Instead of pushing the button on your drive, right-click your CD drive letter in My Computer and click on Eject. This will also remove any icons that have become associated with the CD drive.
16. Start Up Programs: Windows can be slowed down when programs run on start up. To eliminate this, check your Start up folder. You can access it from the start menu: Start, Programs, Start Up. Another way to eliminate programs from loading even before Windows actually starts is by doing the following: Click on Start, then Run. Type msconfig. It will take quite a long time for this program to load, but when you finally see it on your screen, explore the different tabs. They all have to do with how quickly your PC boots, so select what you want, and uncheck what you don't want!
17. Fonts: When Windows starts, it loads every single font in the Fonts folder. Therefore, the more fonts you have, the slower the booting process. To get rid of unwanted fonts, simply go to the Fonts folder under c:\windows and remove whatever you don't want. Fonts that have a red letter 'A' as their icon are system fonts, so don't delete them.
18. Stretching Wallpapers: Don't "stretch" your wallpaper in Windows 98 since it actually slows Windows down when you drag icons around on the desktop.
19. RAM Matters: If you have less than 32MB then you should seriously think of upgrading it to at least 64MB. Windows runs much more smoothly with 64MB or higher and tends to use less hard disk space for virtual memory.
20. Partitioning: A very nice little thing you can do to boost system performance. By partitioning your hard drive, splitting one physical drive into several logical ones, you can gain several advantages. 1. If you get a virus or you accidentally format a drive, not all will be lost. 2. By placing the swap file (Win386.swp) on a separate drive, The swap file will be less fragmented and thus, faster. 3. Place Windows on a separate drive and whenever you need to reinstall it, you rest assured that your data is safe on a separate drive. Partitioning can be done using a few programs such as FDisk which comes with DOS. However, FDisk formats everything on the hard disk before partitioning. Alternatively, you can use Partition Magic from
Power Quest to partition your hard disk without losing your data.
These tips and you will definitely have a much faster and more reliable PC! Most of the below tips works for windows XP.
1. Wallpapers: They slow your whole system down, so if you're willing to compromise, have a basic plain one instead!
2. Drivers: Update your hardware drivers as frequently as possible. New drivers tend to increase system speed especially in the case of graphics cards, their drivers are updated by the manufacturer very frequently!
3. Minimizing: If you want to use several programs at the same time then minimize those you are not using. This helps reduce the overload on RAM.
4. Boot Faster: The 'starting Windows 95/98' message on startup can delay your booting for a couple of seconds. To get rid of this message go to c:\ and find the file Msdos.sys. Remove the Read-Only option. Next, open it in Notepad or any other text editor. Finally, go to the text 'Options' within the file and make the following changes: Add BootDelay=0. To make your booting even faster, set add Logo=0 to remove the Windows logo at startup.
5.. Restart only Windows: When restarting your PC, hold down Shift to only restart Windows rather than the whole system which will only take a fraction of the time.
6. Turn Off Animations: Go to Display Settings from the Control Panel and switch to the Effects Tab. Now turn off Show Windows Content While Dragging and Smooth Edges on Screen Fonts. This tip is also helpful with Windows XP because of the various fade/scroll effects.
7. Faster Start-Menu Access: Go to the Start menu and select Run. Now type Regedit and hit Enter. The Registry Editor will appear on the screen. Now, open the folder HKEY_CURRENT_ USER\Control Panel\Desktop. You should see a MenuShowDelay value. If you don't then do the following: right click on a blank space in the right pane and select New\String. Change the name in the new value to MenuShowDelay. Now that we have the MenuShowDelay value, double click on it and enter 0 in the value data field. This sets the start menu delay to 0 milliseconds.
8. Resolutions: If you are willing to do anything for faster performance from your PC, then try lowering your display resolution. The lower it is, the faster your PC.
9. Turn off Active Desktop: Go to your Display Properties and switch to the Web tab. Uncheck View My Active Desktop As a Web Page. Since the Active Desktop option under Windows 98 uses a lot of system resources, this option can have a dramatic effect on the speed of the whole system.
10. Defragment Often: Windows 98's Defrag tool uses Application Acceleration from Intel which means that when you defragment your drive, data is physically arranged on the drive so that applications will load faster.
11. Take your PC to Bed: Using the Advanced Power Management feature under Windows 98 gives you the option to use the sleep command. That way, you can send your PC to sleep instead of shutting it down and then restarting it. It's as simple as pressing a button and then pressing the same button to wake it up. You can tell Windows after how many minutes/hours of inactivity to automatically sleep the machine in the Advanced Power Management section of the Control Panel.
12. Faster Internet Access: If you use the Internet for reference and the sites you visit are rarely updated then try the following. In IE (the same can be done in Netscape) go to Tools, Internet Options. Next, click on Settings... In the Temporary Internet Files section. Finally, select Never for the first option and double the amount of storage space to use, click OK!
13. Benchmarking: Benchmarking can be very useful when run frequently. It can tell you how your PC's components are performing and then compare them to other machines like yours. For example, when you overclock your PC, you want to know how much more speed you have and whether it is stable. All this and more can be discovered using benchmarking. An excellent piece of software for doing this job is SiSoft Sandra which can be found in the Downloads File Archive!
14. Refresh the Taskbar without restarting: If you in some way change the taskbar, either in Regedit or elsewhere, you can refresh the task bar without restarting. Hold down Ctrl Alt Del, and double click on Explorer. Say Yes to close Explorer, but no to closing Windows. This will refresh the Taskbar and system tray.
15. Quick CD Eject: Instead of pushing the button on your drive, right-click your CD drive letter in My Computer and click on Eject. This will also remove any icons that have become associated with the CD drive.
16. Start Up Programs: Windows can be slowed down when programs run on start up. To eliminate this, check your Start up folder. You can access it from the start menu: Start, Programs, Start Up. Another way to eliminate programs from loading even before Windows actually starts is by doing the following: Click on Start, then Run. Type msconfig. It will take quite a long time for this program to load, but when you finally see it on your screen, explore the different tabs. They all have to do with how quickly your PC boots, so select what you want, and uncheck what you don't want!
17. Fonts: When Windows starts, it loads every single font in the Fonts folder. Therefore, the more fonts you have, the slower the booting process. To get rid of unwanted fonts, simply go to the Fonts folder under c:\windows and remove whatever you don't want. Fonts that have a red letter 'A' as their icon are system fonts, so don't delete them.
18. Stretching Wallpapers: Don't "stretch" your wallpaper in Windows 98 since it actually slows Windows down when you drag icons around on the desktop.
19. RAM Matters: If you have less than 32MB then you should seriously think of upgrading it to at least 64MB. Windows runs much more smoothly with 64MB or higher and tends to use less hard disk space for virtual memory.
20. Partitioning: A very nice little thing you can do to boost system performance. By partitioning your hard drive, splitting one physical drive into several logical ones, you can gain several advantages. 1. If you get a virus or you accidentally format a drive, not all will be lost. 2. By placing the swap file (Win386.swp) on a separate drive, The swap file will be less fragmented and thus, faster. 3. Place Windows on a separate drive and whenever you need to reinstall it, you rest assured that your data is safe on a separate drive. Partitioning can be done using a few programs such as FDisk which comes with DOS. However, FDisk formats everything on the hard disk before partitioning. Alternatively, you can use Partition Magic from
Power Quest to partition your hard disk without losing your data.
Monday, December 29, 2008
Complete list of Engineering Colleges in MUMBAI
These are some list of Engineering Colleges in Mumbai India.
| Engineering Colleges In Mumbai | ||||
| Name & Address | Activity | Phone & Email | Course offered | |
| Dwarkadas J. Sanghvi College of Engineering Plot No. U-16, JVPD Scheme, Bhaktivedanta Swami Marg, Vile Parle (W), Mumbai-56 | Engineering | Ph: 022-26107010, 26107461 Email: djscoe94@rediffmail .com Web: www.djscoe.org | Degree Courses: Bio-Medical Engg. (30), Prod. Engg. (60), Electronics Engg. (60), Chem. Engg.(60), IT, Computer Engg., Electronics & Telecomm. Engg. | |
| Jawahar Education Society's Annasaheb Chudaman Patil College of Engineering Kharghar, New Mumbai | Engineering | Ph: 022-27575722 Web: www.acpcc.org | Electrical Engg., Electronics Engg., Instrumentation Engg., Computer Sc., IT, Electronics & Telecomm. (60 seats each) | |
| Mumbai University University Deptt. of Chemical Tech., Mumbai | Engineering | Ph: 022-4145616 Web:www.udct.org | Degree Courses: B.Chem Dyes (14), B.Chem Foods (11), B.Chem Oils (11), B.Chem Paints (11), B.Chem Pharma (12), B. Chem. Plastics (11), B.Textiles (25), Chem. Engg. (53) | |
| Nagar Yuvak Shikshan Sansthan's Datta Meghe College of Engineering Airoli, Navi Mumbai | Engineering | Ph: 27691662 | Degree Courses: Civil Engg. (90), Chemical Engg. (60), Computer Engg. (120), Electronics Engg. (120), Mechnical Engg. (60), IT (60) | |
| PADMB. Vasantdada Patil Pratishthan' s College of Engineering Estern Express Highway, Sion, Mumbai-22 | Engineering | Ph: 24021526, 24070547 Web: www.pvppcoe. ac.in | BE Courses: Computer (60), Electronics (60), Electronics & Telecom Engg. (40), IT (40), Marine Engg. | |
| Rajiv Gandhi Institute of Tech. Juhu Varsova, Andheri West, Mumbai | Engineering | Ph: 022-26707025 Web: www.rgitm.org | Degree Courses: Elect. & Tele-Comm. Engg. (60), Inst. Engg. (60), Mech. Engg. (60), Computer (120), IT (60) | |
| Saraswati Edu. Soc.'s Saraswati College of Engineering Ploat No. 46/46 A, Sector-5, Kharghar Navi Mumbai-10 | Engineering | Ph: 022-30990422, 27861147 Web: www.saraswatiengg. org | Degree Courses: Electronics and Tele-Comm. Engg. (60), Mech. Engg. (30), Computer Engg. (60), Civil Engg. (60) | |
| A.C. Patil College of Engineering Sector-6, Koperkhairane, Navi Mumbai-09 | Engineering | Electronics, Instrumentation, Electrical, Computer & IT | ||
| Below mentioned is the list of Mumbai Engineering Colleges- | ||||||||||||||||||||||||||||||||||||||||||||||||||
| ||||||||||||||||||||||||||||||||||||||||||||||||||
| Engineering Colleges In Mumbai | ||||
| Name & Address | Activity | Phone & Email | Course offered | |
| Father Conceicao Rodrigues College of Engineering Father Angel Ashram, P.B. No. -6656, Bus Stand Bandra(W), Mumbai Maharashtra | Engineering Affiliated to Bombay University | Email: agnelt@vsnl. com Web: www.frcrce.ac. in | Degree Course: Computer Engg. (60), Electronics Engg. (60), Prod. Engg. (60), IT (40) | |
| Government Institute of Printing Technology Dr. Dadabhai Naoroji Road (Sir J.J. School) of Arts Compound, Mumbai Maharashtra | Engineering Affiliated to SBTET, Maharashtra | Litho Offset Printing | ||
| Government Leather Technology Institute 49, Kherwade, Aliyavar Jung, Marg, Bandra (E), Mumbai Maharashtra | Engineering Affiliated to SBTET, Maharashtra | Leather Goods & Footwear Mfg. | ||
| Government Polytechnic Bombay 49, Kherwadi, Bandra (E), Mumbai Maharashtra | Engineering Affiliated to SBTET, Maharashtra | Mechanical Engineering | ||
| Hyderabad (Sind) National Collegeiate Board Bombay Institute of Technology 47, Dr. R.C. Thadani Marg, Worli, Mumbai Maharashtra | Engineering Affiliated to SBTET, Maharashtra | Computer Technology | ||
| K. J. Somaiya Institute of Engineering & Information Technology K. J. Somaiya Trust, C.S. No. 2 and 2/2, F/W Ward Sion Mumbai Maharashtra | Engineering Affiliated to University of Mumbai | Information Technology | ||
| K.J. Somaiya College of Engineering Vidyanagar, Mumbai Maharashtra | Engineering Affiliated to Bombay University | Ph:-25147265, 25092006 Email:-kjsbsp@rediffmail. com | Mechanical Engineering | |
| K.J. Somaiya Polytechnic Vidyanagar, Vidya Vihar, Mumbai Maharashtra | Engineering Affiliated to SBTET, Maharashtra | Mechanical Engineering | ||
| Kiran Patel Education Trust's Sardar Vallabhbhai Patel Polytechnic S.V.P. Vidyalaya Plot No. 942-A, I.C. Colony Link Road, Borivli(W), Mumbai Maharashtra | Engineering Affiliated to SBTET, Maharashtra | Industrial Electronic & Telecommun-ication | ||
| L & T Institute of Technology C/o Larsen & Toubro Limited, Post Box No. 8975, Saki Vihar Road, Powai Mumbai Maharashtra | Engineering Affiliated to SBTET, Maharashtra | Mechanical Engineering | ||
| Engineering Colleges In Mumbai | ||||
| Name & Address | Activity | Phone & Email | Course offered | |
| Lokmanya Tilak Jankalyan Shikshan Sanstha's College of Technology Vikas Nagar, Sector-4, Koparkh Airane, New Mumbai Maharashtra | Engineering Affiliated to Bombay University | Electrical Engineering | ||
| Mahatma Gandhi Mission's College of Engineering Kamothe, Navi Mumbai | Engineering Affiliated to Bombay University | Ph: 27423403 Web: www.mgmmumbai. ac.in | Degree Courses: Bio-Medical Engg. (60), Chemical Enging (60), Civil Engg. (60), Computer Engg. (90), Electronics & Tele-Comm. Engg. (60), IT (40) | |
| Mahavir Education Society's Shah & Anchor Kutchi Engineering College Shivaji Maharaja Chowk, Waman Tukara Patil Marg, Chembur, Mumbai Maharashtra | Engineering Affiliated to Bombay University | Ph: 022-25580854 Email: mail@shahandanchor. com Web: www.shahandanchor. com | Computer Science & Engineering | |
| Manjara Charitable Trust College of Engineering Sector-4, P.B. No.-14, Airoli, New Mumbai Maharashtra | Engineering Affiliated to Bombay University | Computer Science & Engineering | ||
| Manohar Pahalke Memorial Foundation's Polytechnic Eastern Express Highway, Sion-Chuna Bhatti Mumbai Maharashtra | Engineering Affiliated to SBTET, Maharashtra | Information Technology | ||
| Maratha Mandir's Babasaheb Gawde Institute of Technology Maratha Mandir Building, IIIrd Floor, Mumbai Central, Mumbai Maharashtra | Engineering Affiliated to SBTET, Maharashtra | Information Technology | ||
| Multipurpose Education Society's Radio Electrical Institute Lamington Chambers, Bhadkamkar Road, Mumbai Maharashtra | Engineering Affiliated to SBTET, Maharashtra | Electronics & Video Engineering | ||
| Nagar Yuwak Shikshan Sanstha's College of Engineering Plot No. 98, P. B. No -15, Sector -III, CIDCO Colony, Airoli, New Mumbai Maharashtra | Engineering Affiliated to Bombay University | Ph: 27691662 | Civil Engg. (90), Chemical Engg. (60), Computer Engg. (120), Electronics Engg. (120), Mech. Engg. (60), IT(60) | |
| Ramarao Adik Education Society's Ramarao Adik Institute of Technology Phase-1, Sector-7, D.Y. Patil Vidyanagar, Nerul, Navi Mumbai, District - Pune Maharashtra | Engineering Affiliated to Bombay University | Ph: 022-27709505/ 574 Web: www.dypatil. com | Degree Courses: Instrumental Engg. (60), Elect. and Telecomm. (90), IT (60) | |
| Rizvi Education Society's Rizvi College of Engineering Rizvi House, 1st Floor, On Off Hill Road, St. Martin Road, Bandra(W), Mumbai Maharashtra | Engineering Affiliated to Bombay University | Electronics Engineering | ||
| Engineering Colleges In Mumbai | ||||
| Name & Address | Activity | Phone & Email | Course offered | |
| Shri Vile Parle Kelvani Mandal's College of Engineering Plot No. U-15, J.V.P.D. Scheme, Bhaktivedanta Swami Marg, Vile Parle(W), Mumbai Maharashtra | Engineering Affiliated to Bombay University | Electronics & Communication Engineering | ||
| Smt. Indira Gandhi Engineering College, CIDCO, Sec-16, Koper khairane, New Mumbai Maharashtra | Engineering Affiliated to Bombay University | Ph: 022-27543608 Web:www.sigce.net | Degree Courses: Computer Engg. (60), Electrical Engg. (60), Electronics & Tele-Comm. Engg.(60), Instrumentation Engineering (60) | |
| St. Francis Institute of Technology Mt Poinsur Borivili (West), Mumbai Maharashtra | Engineering Affiliated to Bombay University | Ph: 28928585, Fax:28924787 Email: sfitlib@vsnl. com | Computer Science & Engineering | |
| Terna Engineering College CBD, Sector-12, Phase-II, Nerul, New Mumbai Maharashtra | Engineering Affiliated to Bombay University | Ph:-022-27718134 Web: www.terna.org | Degree Courses: Computer Engg. (90), Electronics Engg.(60), Electronics & Telecomm. (90), IT (60) | |
| Thadomal Shahni Engineering College 32nd Road, T.P.S. -III, Bandra, Mumbai Maharashtra | Engineering Affiliated to Bombay University | Email: -tsec@tsec.edu | Chemical Engineering | |
| Thakur College of Engineering & Technology Thakur Village, East of Western Express Highway Kandivali(E) , Mumbai Maharashtra | Engineering Affiliated to University of Mumbai | Ph: 28461891, Email:- tcet@thakureducatio n.org Web: www.thakureducation .org | BE Courses: Computer (60), Electronics & Telecom (60), IT (120) | |
| University Department of Chemical Technology Matunga, Mumbai Maharashtra | Engineering Affiliated to Bombay University | Textile Chemistry | ||
| V.J.T. Institute H.R. Mahajani Marg, Matunga(East) , Mumbai Maharashtra | Engineering Affiliated to Bombay University | Ph: 022-4146972, 73747576 Email: principal@vjti. ac.in Web: www.vjti.ac. in | BE Coures: Civil (60), Electronics Engg.(60), Mech. Engg. (60), Prod. Engin. (40), Textile Engg. (20) | |
| Vidyalankar Institute of Technology Indian Home Pipe Road, Antop Hill, Wadala (E), Mumbai-37 | Engineering Affiliated to Bombay University | Ph: 24761126 Web: www.vidyalankar. ac.in | BE Courses: Compute (60), Electronics (60), IT (60) | |
| Vivekand Education Society's College of Engineering Chembur, Mumbai Maharashtra | Engineering Affiliated to Bombay University | Ph: 022-5227638, 5227864 Web: www.vesit.edu | Degree Courses: Comp. Engg. (60), Electronics Engg.(60), Electronics & TeleComm. Engg (60), Instrumentation Engg. (60), IT (60) | |
| Engineering Colleges In Mumbai | ||||
| Name & Address | Activity | Phone & Email | Course offered | |
| Watumal Institute of Electronics Engineering & Computer Technology 47, Dr. R.G. Thadani Marg, Worli, Mumbai Maharashtra | Engineering Affiliated to Bombay University | Ph: 24935281 Web:www.watumull. edu | Degree Courses: Electronics & Telecomm. Engg. (60), Computer Sc. Engg. (60), Instrumentation Engg.(30), Biomedical Engg. (60) | |
| Naval Institute of Technology 4 Pasta Lane, Colaba, Mumbai Maharashtra | Engineering SBTET, Maharashtra | Electronics & Tele Communication Engineering | ||
| Navjeevan Education Society's Polytechnic Ganesh Nagar, Ganesh Path, Bandup, Mumbai Maharashtra | Engineering SBTET, Maharashtra | Information Technology | ||
| Premlila Vithaldas Polytechnic S.N.D.T. Women's University, Sir Vithaldas Vidya Vihar, Juhu Road, Santacruz(W) , Mumbai Maharashtra | Engineering SBTET, Maharashtra | Optholmic Technology | ||
| Shri Vile Parle Kelvani Mandal's Shri Bhagubhai Mafatlal Polytechnic Irla Juhu Road, Vile Parle(W), Mumbai Maharashtra | Engineering SBTET, Maharashtra | Plastic Engineering | ||
| Silk & Art Mills Research Ass. (Sasmira's) Institute of Man-Made Textiles Dr. A.B. Road Worli, Mumbai Maharashtra | Engineering SBTET, Maharashtra | Manmade Firbe Manufacturing | ||
| Sophia Shree Basant Kumar Somani Memorial Polytechnic Bhulabhai Desai Road, Mumbai Maharashtra | Engineering SBTET, Maharashtra | Dress Making & Designing | ||
| St. Xaviers Technology Institute Mahim Casueway Road, Mahim, Mumbai Maharashtra | Engineering SBTET, Maharashtra | Electronics & Video Engineering | ||
| Terna P. Charitable Trust Terna Polytechnic Sector-1, Kopark-Hairane, Thane Belapur Road, Navi Mumbai Maharashtra | Engineering SBTET, Maharashtra | Electronics & Tele Communication Engineering | ||
| Vivekanand Education Society's Polytechnic Sindhi Society, Chembur, Mumbai Maharashtra | Engineering SBTET, Maharashtra | Electronics & Video Engineering | ||
| Zagdu Singh Charitable Trust's Polytechnic Ashok Nagar, Kandivili (E), Mumbai Maharashtra | Engineering SBTET, Maharashtra | Mechanical Engineerin | ||
Sunday, December 28, 2008
Start Programs using Run Commands
These are some tips to run the program quickly. This commands will work in Start -> Run. Open the Run and type these commands to get start your programs quickly.
Run Commands
Appwiz.cpl -- Used to run Add/Remove wizard
Calc --Calculator
Cfgwiz32 --ISDN Configuration Wizard
Charmap --Character Map
Chkdisk --Repair damaged files
Cleanmgr --Cleans up hard drives
Clipbrd --Windows Clipboard viewer
Control --Displays Control Panel
Cmd --Opens a new Command Window
Control mouse --Used to control mouse properties
Dcomcnfg --DCOM user security
Debug --Assembly language programming tool
Defrag --Defragmentation tool
Drwatson --Records programs crash & snapshots
Dxdiag --DirectX Diagnostic Utility
Explorer --Windows Explorer
Fontview --Graphical font viewer
Fsmgmt.msc -- Used to open shared folders
Firewall.cpl -- Used to configure windows firewall
Ftp -FTP.exe program
Hostname --Returns Computer's name
Hdwwiz.cpl -- Used to run Add Hardware wizard
Ipconfig --Displays IP configuration for all network adapters
Logoff -- Used to logoff the computer
MMC --Microsoft Management Console
Msconfig --Configuration to edit startup files
Mstsc -- Used to access remote desktop
Mrc -- Malicious Software Removal Tool
Msinfo32 --Microsoft System Information Utility
Nbtstat --Displays stats and current connections using NetBIOS over TCP/IP
Netstat --Displays all active network connections
Nslookup--Returns your local DNS server
Osk ---Used to access on screen keyboard
Perfmon.msc -- Used to configure the performance of Monitor.
Ping --Sends data to a specified host/IP
Powercfg.cpl -- Used to configure power option
Regedit --Registry Editor
Regwiz -- Registration wizard
Sfc /scannow -- System File Checker
Sndrec32 --Sound Recorder
Shutdown -- Used to shutdown the windows
Spider -- Used to open spider solitaire card game
Sfc / scannow -- Used to run system file checker utility.
Sndvol32 --Volume control for soundcard
Sysedit -- Edit system startup files
Taskmgr --Task manager
Telephon.cpl -- Used to configure modem options.
Telnet --Telnet program
Tracert --Traces and displays all paths required to reach an Internet host
Winchat -- Used to chat with Microsoft
Wmplayer -- Used to run Windows Media player
Wab -- Used to open Windows address Book.
WinWord -- Used to open Microsoft word
Winipcfg --Displays IP configuration
Winver -- Used to check Windows Version
Wupdmgr --Takes you to Microsoft Windows Update
Write -- Used to open WordPad
Please use these commands if you know what you are going to do
Run Commands
Appwiz.cpl -- Used to run Add/Remove wizard
Calc --Calculator
Cfgwiz32 --ISDN Configuration Wizard
Charmap --Character Map
Chkdisk --Repair damaged files
Cleanmgr --Cleans up hard drives
Clipbrd --Windows Clipboard viewer
Control --Displays Control Panel
Cmd --Opens a new Command Window
Control mouse --Used to control mouse properties
Dcomcnfg --DCOM user security
Debug --Assembly language programming tool
Defrag --Defragmentation tool
Drwatson --Records programs crash & snapshots
Dxdiag --DirectX Diagnostic Utility
Explorer --Windows Explorer
Fontview --Graphical font viewer
Fsmgmt.msc -- Used to open shared folders
Firewall.cpl -- Used to configure windows firewall
Ftp -FTP.exe program
Hostname --Returns Computer's name
Hdwwiz.cpl -- Used to run Add Hardware wizard
Ipconfig --Displays IP configuration for all network adapters
Logoff -- Used to logoff the computer
MMC --Microsoft Management Console
Msconfig --Configuration to edit startup files
Mstsc -- Used to access remote desktop
Mrc -- Malicious Software Removal Tool
Msinfo32 --Microsoft System Information Utility
Nbtstat --Displays stats and current connections using NetBIOS over TCP/IP
Netstat --Displays all active network connections
Nslookup--Returns your local DNS server
Osk ---Used to access on screen keyboard
Perfmon.msc -- Used to configure the performance of Monitor.
Ping --Sends data to a specified host/IP
Powercfg.cpl -- Used to configure power option
Regedit --Registry Editor
Regwiz -- Registration wizard
Sfc /scannow -- System File Checker
Sndrec32 --Sound Recorder
Shutdown -- Used to shutdown the windows
Spider -- Used to open spider solitaire card game
Sfc / scannow -- Used to run system file checker utility.
Sndvol32 --Volume control for soundcard
Sysedit -- Edit system startup files
Taskmgr --Task manager
Telephon.cpl -- Used to configure modem options.
Telnet --Telnet program
Tracert --Traces and displays all paths required to reach an Internet host
Winchat -- Used to chat with Microsoft
Wmplayer -- Used to run Windows Media player
Wab -- Used to open Windows address Book.
WinWord -- Used to open Microsoft word
Winipcfg --Displays IP configuration
Winver -- Used to check Windows Version
Wupdmgr --Takes you to Microsoft Windows Update
Write -- Used to open WordPad
Please use these commands if you know what you are going to do
Sunday, December 21, 2008
How to configure LAN
Hi,
Greetings from your friend. I am going to tell you how to configure the LAN settings in various Operating Systems. First how to configure in Windows 98 and in Windows NT and then Windows XP. This will help you to configure in your Office or in your Home.
First in Windows 98.
1. Click Start the Control Panel via the Start menu.
2. Open the "Network" Control Panel.
3. This is the Network Control Panel window. You may have many more items showing. Look for this one:


 PCI Ethernet DECchip 21041 Based Adapter" width="284" height="18">
If not, look for this one:

If you don't see either of them, click the

4a. If you don't have the PCI DECchip 21041 Based Adapter, select "Adapter" and click
4b. Select "Digital Equipment" in the left column, then "PCI Ethernet DECchip 21041 Based Adapter" in the right hand column. Click


5a. You're back to this window. Now that you have the DECchip 21041 adapter installed, select "Protocol" and click


5c. You will notice that there is now a TCP/IP protocol for every adapter. You want this one
PCI Ethernet DECchip 21041 Based Adapter" width="284" height="18">but there's one other setting to check before you work with it. Read on...
You may be able to delete the others, but you do so at your own risk.
6. Click on
then click
Be careful what you click! You must select the adapter itself, not its protocol, for this step!


6b. Select the |Bindings| tab, make sure the box shown is checked, then click
7. Select
PCI Ethernet DECchip 21041 Based Adapter" width="284" height="18">then click
Yeah, Windows is just like a Mac. Sure.
If you have a TCP/IP Address give it in under the option called Specify an IP address on clicking this the two text box will be enabled under this you can type the IP address and Subnet Mask.
This is the simple procedure to configure the LAN in Office or in your Home. I hope this information will help you configure the LAN.
AIX Fast Connect
Configuring Client PCs
Use the information in this chapter to connect a PC client to the AIX Fast Connect server.
TCP/IP Configuration
To access the AIX Fast Connect server, each client PC must be configured for NetBIOS over TCP/IP (RFC1001/1002), or must support direct hosting of SMB over TCP/IP (see Microsoft® Knowledge Base article 204279). Also, each client PC needs to have Client for Microsoft Networks installed. This can be accomplished for the various clients as shown in the following sections.
Windows 98 Clients
To configure Windows® 98 clients to access the AIX Fast Connect server, follow these steps:
- From the Start button, select Settings -> Control Panel -> Network.
- On the Configuration tabbed panel (initially shown), verify that the following entries exist:
- An entry for your networking-card (hardware driver)
- TCP/IP (protocol)
- Client for Microsoft Networks (client)
- Click the TCP/IP entry and select Properties.
The TCP/IP Properties dialog box has several tabbed panels. Verify the following:- IP Address panel
- Configure as needed. (For initial testing, you might want to disable DHCP and manually specify unique IP addresses for each PC.)
- Bindings panel
- Select Client for Microsoft Networks.
Additionally, you might want to enable WINS support, DNS support, or gateway support for each client. If so, configure each as needed.
- Test the client TCP/IP configuration by pinging (by IP address) from the PC client DOS prompt to the AIX Fast Connect server, and in reverse.
Windows NT Clients
To configure Windows NT® clients to access the AIX Fast Connect server, follow these steps:
Note:
You must be logged in as an Administrator.
- From the Start button, select Settings -> Control Panel -> Network.
- On the Adapters tabbed panel, verify that you have a correctly configured entry for your networking card (hardware driver).
- On the Services tabbed panel, verify that there are entries for the following services:
- Computer Browser
- NetBIOS Interface
- Workstation
- On the Protocols panel, add TCP/IP (if missing), then select Properties.
The TCP/IP Properties dialog box has several tabbed panels. Verify the following:- IP Address panel
- Configure as needed. (For initial testing, you might want to disable DHCP and manually specify unique IP addresses for each PC.)
You might also want to configure DNS, WINS Address, and Routing.
- Test the client TCP/IP configuration by pinging (by IP address) from the PC client DOS prompt to the AIX Fast Connect server and in reverse.
Windows XP, Windows 2003, and Windows 2000 Clients
To configure Windows 2000/XP/2003 clients to access the AIX Fast Connect server, follow these steps:
Note:
You must be logged in as an Administrator.
- From the Control Panel, open Network and Dialup Connections (Windows 2000) or Network Connections (Windows XP/2003).
- Right-click on the Local Area Connection icon of the network adapter to be configured. Select Properties.
- On the General tabbed panel, verify that there are checked entries for the following components:
- Your networking card entry (Windows 2000)
- Client for Microsoft Networks
- Internet Protocol (TCP/IP)
- Select the TCP/IP entry, then select Properties. Configure as needed.
(For initial testing, you may want to disable DHCP and manually specify unique IP addresses for each PC.) - Test the client TCP/IP configuration by pinging (by IP address) from the PC client DOS prompt to the AIX Fast Connect server and in reverse.
NetBIOS Name Resolution
In addition to being able to ping the AIX Fast Connect server over TCP/IP, each client PC also must be able to resolve the NetBIOS name of the AIX Fast Connect server (the AIX Fast Connect servername) to an IP address. This can be done using UDP-Broadcast, LMHOSTS files, DNS, or WINS.
- UDP-Broadcast (B-node)
- The simplest NetBIOS name resolution (both in terms of setup and functionality) is UDP-Broadcast (B-node name resolution). No additional setup is required on the PC client as long as the client is on the same physical network segment (such as Ethernet or Token Ring) as the AIX Fast Connect server. The PC client broadcasts a UDP NetBIOS query to the local network, to which the AIX Fast Connect server responds. Note:This mechanism does not work across TCP/IP routers, or gateways. Larger networks typically use DNS or WINS.
- LMHOSTS files
- Windows PCs can provide local LMHOSTS files for resolving NetBIOS names. Similar to /etc/hosts on AIX, each PC can have an LMHOSTS file to statically resolve NetBIOS names to IP addresses. (This mechanism might be unsuitable for DHCP environments or networks with many client PCs, because every LMHOSTS file must change whenever the AIX Fast Connect servers' IP addresses change.)
The following is an example of editing an LMHOSTS file on Windows 98 from the DOS prompt:
C:\>  cd \windows
C:\>  edit lmhosts     (LMHOSTS.SAM is included with Windows as an example.)
On a Windows NT, Windows 2000, Windows XP, or Windows 2003 machine, do the following:
C:\> cd \winnt\system32\drivers\etc
C:\> edit lmhosts
After editing the LMHOSTS file, run the Windows PC command nbtstat -R.
- DNS
- If your network is running the domain name service (DNS) for TCP/IP and your AIX Fast Connect servername is registered in the DNS, each client PC can be configured to use DNS for NetBIOS name resolution. (This must be enabled under TCP/IP Properties for Windows NT.)
During installation, the AIX Fast Connect servername defaults to match the AIX hostname.
- WINS
- Your Windows network might use Windows Internet Naming Service (WINS) for NetBIOS name resolution. Similar to DNS for TCP/IP, WINS allows NetBIOS service names to be resolved to IP addresses across multiple LAN segments. When this is the case, each Client PC is configured to use the WINS server under TCP/IP Properties.
Additionally, use the SMIT fast path smit smbcfghatt to set the WINS Address entry and Backup WINS Server for the AIX Fast Connect server. The AIX Fast Connect server uses these IP addresses to automatically register its NetBIOS server name with the WINS servers.
You can configure one or more AIX Fast Connect servers to act as NBNS/WINS servers. For more information, see NetBIOS Name Service (NBNS).
At this point, if you have LMHOSTS, DNS, or WINS correctly configured, you can ping from the client PC by using the NetBIOS server name.
Workgroups, Domains, and User Accounts
AIX Fast Connect supports several different types of user authentication/access mechanisms. (See User Administration and Basic Server Administration.) Each client PC should be configured to match the AIX Fast Connect user-access method you have chosen for your network.
For ease of use, client PCs should be in the same Windows domain as the AIX Fast Connect server (the reverse is also true). Windows NT, Windows 2000, and Windows XP all use WORKGROUP as a default workgroup name, and AIX Fast Connect server also initializes itself to use WORKGROUP. If your network uses NT domain login authentication, you can configure the AIX Fast Connect server to verify AIX Fast Connect access using the NT domain authentication servers.
Whether you use Workgroups or NT domains, access to AIX Fast Connect is managed by user security. You must set up AIX user accounts for each Windows user who is accessing AIX Fast Connect. It is easiest to use if the user accounts (and passwords) on AIX match the Windows or NT domain user accounts (and passwords).
- On the AIX Fast Connect server, use the SMIT fast path:
smit smbcfghatt
Within the SMIT panel, do the following:
- To use Workgroups, type the workgroup name in the Domain Name field.
- To use NT domain validation, type the IP addresses for the NT domain authentication server(s) in the Passthrough Authentication Server and Backup Passthrough Authentication Server fields.
- On PC clients running Windows 98, do the following:
- Select Start button -> Settings -> Control Panel -> Network.
- On the Identification panel, type the computer name for that PC.
- Configure the domain:
- To use workgroups, type the workgroup name in the Workgroup field.
- To use NT domain validation,
- On the Configuration tabbed panel, select Client for Microsoft Networks, and click Properties.
- Check the NT domain checkbox, and type the NT domain name. (To join an NT domain, you must have Domain Administrator privileges.)
- On PC clients running Windows NT, make sure you are logged in as Administrator. Then:
- Select Start button -> Settings -> Control Panel -> Network.
- On the Identification panel, select Change... .
- Type the Computer Name for that PC.
- Type the appropriate workgroup or domain name. (To join an NT domain, you must have Domain Administrator privileges.)
- On PC clients running Windows 2000, make sure you are logged in as Administrator. Then:
- Select Start button -> Settings -> Control Panel -> System.
- On the Network Identification panel, select Properties.
- Type the Computer Name for that PC.
- Type the appropriate workgroup or domain name. (To join an NT domain, you must have Domain Administrator privileges.)
- On PC clients running Windows XP or Windows 2003, make sure you are logged in as Administrator. Then follow these steps:
- From the Control Panel, choose System.
- On the Computer Name panel, select Change.
- Type the computer name for that PC.
- Type the appropriate workgroup or domain name. (To join an NT domain, you must have Domain Administrator privileges).
Enabling Windows Clients for Plain Text Passwords
For security reasons, Microsoft has disabled support for nonencrypted (plain text) network passwords in all supported versions of Windows. If you want to use plain text passwords on your network, these clients must be upgraded with the following Registry patches.
Note:
Microsoft has recommended the current System Registry be saved as a backup before any manual changes are made to it. For details, see Microsoft's technet web site.
- To enable plain text passwords on Windows 98, complete the following:
- Use your favorite text editor to create the following text file, named W98plain.reg, as a local file on the Windows 98 machine:
REGEDIT4

; Registry file to allow plaintext passwords on Windows 98

[HKEY_LOCAL_MACHINE\System\CurrentControlSet\Services\VxD\VNETSUP]
"EnablePlainTextPassword"=dword:00000001 - Using Windows Explorer, double-click the W98plain.reg file name in the directory where you saved it. This action will update the Windows Registry for that client to allow plain text passwords.
- Shut down and restart the Windows 98 machine. (Shut down and restart is required for this patch to take effect.)
- Use your favorite text editor to create the following text file, named W98plain.reg, as a local file on the Windows 98 machine:
- To enable plain text passwords on Windows NT 4.0, log in as Administrator. Then:
- Use EDIT or the NOTEPAD accessory to create the following text file, named NT4plain.reg, as a local file on the Windows NT machine:
REGEDIT4

; Registry file to allow plaintext passwords on Windows NT 4.0

[HKEY_LOCAL_MACHINE\SYSTEM\CurrentControlSet\Services\Rdr\Parameters]
EnablePlainTextPassword=dword:00000001 - Using Windows NT Explorer, double-click the NT4plain.reg file name in the directory where you saved it. This action will update the Windows Registry for that client to allow plain text passwords.
- Shut down and restart the Windows NT machine. (Shut down and restart is required for this patch to take effect.)
Note:Even with the previous patch installed, all Windows NT 4.0 clients still require users to type their password every time the user first connects to the AIX Fast Connect server (by browsing, mapping drives, and so on). After the user is successfully connected, additional browsing or drive-mapping operations proceed successfully. The initial Password Invalid message occurs because Windows NT 4.0 attempts to use encrypted passwords rather than plain text passwords, while connecting to AIX Fast Connect server. - Use EDIT or the NOTEPAD accessory to create the following text file, named NT4plain.reg, as a local file on the Windows NT machine:
- To enable plain text passwords on Windows 2000, Windows XP, and Windows 2003, log in as Administrator. Then:
- From the Control Panel, open Administrative Tools, then open Local Security Policy.
- On the Tree view, select Local_Policies -> Security_Options.
- On the Policy list (right-hand panel), enable the entry Send unencrypted password to connect to third-party SMB servers.
- Shut down and restart the Windows machine
Browsing the Network
AIX Fast Connect supports browser operations such as NET VIEW and Network Neighborhood (renamed My Network Places on Windows XP and Windows 2000). These operations show the user a list of file shares and printer shares exported by each server.
Network Neighborhood can also be used to map drives. To do this, right-click on a file share name, then select Map Network Drive from the menu.
Note:
Network browsing has the following limitations:
- To see the AIX Fast Connect server in Network Neighborhood, a client PC needs to be able to see the Master Browser for the workgroup or domain for which that AIX Fast Connect server is configured.
Network browsing generally works best if the client PC and the AIX Fast Connect server are in the same workgroup/domain.
- The browse list database that is maintained by the Master Browser is not always up-to-date. The list can show AIX Fast Connect server names for servers that are currently down, off, physically disconnected, or otherwise unreachable. The Master Browser does not delete a server from the browse list until that server name's refresh timeout has expired, which can take several days. However, if a user tries to access that server name (by browsing share names, mapping drives, and so on), a disconnected AIX Fast Connect server is detected as unavailable.
Mapping Drives
Normally, PC clients must define drive mappings to use the AIX Fast Connect exported file shares. These drive mappings can be done from Windows or from the DOS command prompt.
You can use the following mechanisms to define or undefine mappings between PC drive letters and AIX Fast Connect file shares. For the following examples, assume that the NetBIOS server name is cifs01, and that file share apps is defined.
From DOS:
DOS> net help                     (help info for DOS)
DOS> net use H: \\cifs01\home     (pre-defined AIX Fast Connect share)
DOS> net use F: \\cifs01\apps
DOS> copy F:\oldfile H:\newfile   (uses the mapped drives)
DOS> net use F: /delete           (delete the drive-mapping)
From Windows:
- In the Map Network Drive dialog box:
- Select Windows Explorer -> Tools -> Map Network Drive.
-or-
- Right-click on Network Neighborhood and select Map Network Drive.
- Select Windows Explorer -> Tools -> Map Network Drive.
- Select the drive from the Drive: drop-down list, then:
- Enter the path: (for example, \\cifs01\apps).
-or-
- Use the Shared Directories (browse tree) panel to select the network share.
- Enter the path: (for example, \\cifs01\apps).
Using AIX Fast Connect Printers
For printing, DOS and Windows mappings are somewhat different. For the following examples, assume that AIX Fast Connect server cifs01 has print shares netprint1 and pscolor defined.
For DOS applications, the following simple device-mappings can be used:
DOS> net use LPT1: \\cifs01\netprint1
DOS> net use LPT2: \\cifs01\pscolor
To test these DOS printer-mappings, use the following:
DOS> COPY text_file LPT1:
DOS> COPY Postscript_file LPT2:
Note:
During print-spooling, neither DOS nor AIX Fast Connect auto-convert Postscript to text, or in reverse. However, this auto-detection/auto-convert feature can be enabled using AIX print-spooling options.
For Windows applications, install a Windows printer driver and map it to the network printer, as follows:
- Select Start -> Settings -> Printers -> Add Printer.
- Select Network Printer.
- Enter the AIX Fast Connect print share name (for example, \\cifs01\netprint1) or use the browse list to select the print share.
- Select the correct Windows printer driver for that network printer (for example, IBM® 4039 Laser Printer PS), which is installed from your Windows installation disks.
Test Windows printer-driver functionality by printing a test file from any Windows application (for example, Notepad), or by using the Print Test Page feature as follows:
- Select Start -> Settings -> Printers.
- Select the printer driver (for example, pscolor).
- From the Menu Bar, select File -> Properties.
- From the tabbed panel labeled General, select Print Test Page.
Note:
For windows 98 and NT clients, AIX Fast Connect supports displaying the full name of the document being printed (in the client's print status window). For other clients, a generated name will be displayed.
Support for Windows Terminal Server
AIX Fast Connect is compatible with the Windows Terminal Server program. This program allows multiple PC clients running Windows Terminal Client software to log in to the Windows Terminal Server and establish a remote console session. Any network drive (or network printer) mapping made within that console session is forwarded by Windows Terminal Server to other NetBIOS servers, as required.
Windows Terminal Server (and other similar terminal-server programs) must accommodate multiple net mappings by multiple user names coming from multiple client PCs. Windows Terminal Server (and other terminal servers) can multiplex these requests to AIX Fast Connect using the following mechanisms:
- Multiple TCP/IP sessions (from a single Windows Terminal Server PC) to AIX Fast Connect
- Multiple SMB sessions multiplexed into a single TCP/IP session
To enable Windows Terminal Server support, set multiuserlogin=1.
If either Network Logon support or NT-passthrough authentication is enabled, Windows Terminal Server is not supported.
For specific information about setup and use of Windows Terminal Server and Windows Terminal Client, see your Windows Terminal Server documentation.
Support for Windows Active Directory Server
AIX Fast Connect can use the AIX LDAP client (ldap.client.rte) to access a Windows Active Directory Server. The cifsLdap command allows AIX Fast Connect to register and unregister its file share names and print share names into the Windows Active Directory. For more information, see the cifsLdap command.
Configuring LAN Manager authentication level
By default, AIX® Fast Connect supports the LM (LAN Manager) authentication only. AIX Fast Connect can be configured to support NTLM (NT LAN Manager) authentication instead by enabling the lm_encryption_level parameter (For details, see Appendix B. Configurable Parameters for the net Command). Most Windows clients will support either LM or NTLM authentication methods by default.
Windows 2003 clients must be specifically configured to support LM authentication.
- From the Control Panel, open Administrative Tools, then open Local Security Policy.
- On the tree view, select Local Policies -> Security Options.
- On the Policy list (right-hand panel), set the LAN Manager authentication level to Send LM & NTLM responses.
- Shut down and restart the Windows machine
Friday, December 19, 2008
Cloning with Linux
These are the simple tips for Cloning with Linux and this tips helps you to configuration with Command-line switches.
This chapter includes the following topics:
■ Supported configurations
■ Position of disk
■ Boot configuration
■ Norton Ghost utility support
Supported configurations
Norton Ghost can copy or clone many different Linux distributions successfully.
However, Norton Ghost is sensitive to any possible changes in Ext2/3 file system
and LILO specifications. If changes are made to these specifications, Norton
Ghost may no longer support the Linux distribution. Symantec attempts to
release new builds of Ghost promptly to address such changes.
Norton Ghost is not sensitive to kernel versions. Use the -ial and -nolilo
command-line switches to resolve problems with any incompatibilities.
What is Command- line switches
Command-line switches
Using Norton Ghost with swtches
Norton Ghost can be run in the following ways:
■ Interactively with no command-line switches
■ Interactively with selected switches
■ Automated in batch files (batch mode)
The Norton Ghost command-line switches are used to alter Norton Ghost
behavior and automate procedures.
If you are adding switches from the Advanced Options dialog box, some of these
switches, for example, the -clone switch, are not applicable to your task. Because
you are already performing a backup, restore, or clone operation, the -clone
switch is redundant.
To list Norton Ghost command-line switches
◆ In the Ghost directory, type one of the following:
■ ghost.exe -h
■ ghost.exe -?
A hyphen (-) or a slash (/) must precede all switches except @. Switches are not
case sensitive. They can be entered in upper, lower, or mixed case.
Command-line switches
@filename
Specifies a file that contains additional command-line switches that Norton Ghost should
read. Filename indicates the path and file name of the command-line switch file. The
command-line switch file can include any Norton Ghost command-line switch, except for
-afile and -dfile. The Norton Ghost command-line switch file must be a text file with each
switch on a separate line. This feature lets you exceed the DOS command-line limit of 150
characters.
For example, for the following command line:
ghost.exe @ghswitch.txt
The file Ghswitch.txt would read:
-clone,mode=pcreate,src=1:2,dst=g:\part2.gho
-fcr
-sure
-afile=filename Replaces the default abort error log file name, Ghosterr.txt, with the
directory and file given in filename.
-auto Automatically names spanned image files during creation. Using this switch avoids the
user prompt that asks for confirmation of the next destination location for the remainder
of the image file that is being loaded. This switch is the default behavior for Norton Ghost.
-batch Batch mode switch. Prevents abort messages from waiting for user
acknowledgment, and removes user interaction prompts. The return value of Ghost.exe
must be checked to identify whether the operation was successful. Norton Ghost returns 0
on success and 1 or higher on failure or error.
-bfc Handles bad FAT clusters when writing to disk. If this switch is set, and the target
partition is FAT, Norton Ghost checks for and works around bad sectors. This option may
slow Norton Ghost operation substantially.
-bootcd When writing an image directly to a CD/DVD writer, makes the CD/DVD bootable. You
need a bootable floppy disk in drive A. If you use the -sure switch with -bootcd, and a
floppy disk is not in drive A, then a non-bootable CD/DVD is created.
-buffersize=x Ghost creates an image file using a small buffer where x = number of KB. The size
of the buffer is automatically calculated by Norton Ghost. The buffersize switch lets you
override this size. You can set the buffer size value from 1 to 32.
-chkimg,filename Checks the integrity of the image file indicated by filename.
-clone Ghost.exe operation switch. This switch allows automation of Ghost.exe operations and
has a series of arguments that define the operation parameters.
See “Clone switch usage” on page 166.
-cns Reverts the naming of spanned files to the system used by versions of Norton Ghost prior
to Symantec Ghost 6.5. If this switch is not used, then the naming of spanned files
conforms to Microsoft application guidelines. You do not need to use this switch when
reading an existing file. Use this switch when the first five characters in a file name must be
unique. For example:
With -cns Without -cns
Filename.gho Filename.gho
Filename.001 Filen001.ghs
Filename.002 Filen002.ghs
-CRC32
The -CRC32 switch lets you make a list of the files on a disk or partition or create an
image file with CRC values and then verify the list against the original or a copy. The
purpose is to allow both quick listing of the contents of an image file and verification that
a disk created by Norton Ghost contains the same files as the original.
-crcignore
Ignores CRC errors. CRC errors indicate data corruption. This switch overrides the CRC
error detection and may let a corrupted image file be used. Using this switch leaves the
corrupted files in an unknown state. You can use this switch to help you extract files from
a corrupted image file.
-cvtarea
Creates a file, Cvtarea.tmp, that is the location of the MFT when the FAT32 partition is
converted to NTFS. This switch operates in a similar manner to the cvtarea program that
Microsoft provides in Deploy.cab on the Windows XP installation CD.
For more information, see the Microsoft Web site:
http://www.microsoft.com/hwdev/tech/storage/ntfs-preinstall.asp
The file is created in the root directory of the partition during a partition or disk restore
and is created as a contiguous space on the disk. The largest size allowed is 4 GB. If the file
is larger than this, it is truncated to 4 GB.
The syntax for this switch is as follows:
-cvtarea,
filename=xxx,size=yyy{%disk,%free,KB,MB,GB},
firstcluster=zzz{%disk,%free,KB,MB,GB}
filename cvtarea.tmp
size 12%disk
firstcluster 1|3 GB|33%disk
Defaults to:
■ 1/3 of the partition size if the partition size is less than 2 GB
■ 1 GB if the partition size is less than 6 GB
■ 3 GB if the partition size is equal to or greater than 6 GB
-dd
Dumps disk metrics information to the dump log file, Ghststat.txt. The file location can be
altered using the -dfile=filename switch.
-dfile=filename Changes the path and file name of the dump log file created using the -dd switch.
This switch cannot be included in the @ Ghost switch text file
Command-line switches 157
Command-line switches
-dl=number Specifies the number of hard disks present. Valid numbers are between 1 and 8. This may help when the BIOS does not report the number of drives correctly.
-dlist=drives Specifies a list of drives to search for span files. If a span file cannot be found, then the drive letters in dlist are substituted one by one to look for the file on other drives.
For example, the command ghost -dlist=CDEFG instructs Norton Ghost to look for files
on C, D, E, F, and G drives. The path remains the same.
-f32
Lets Norton Ghost convert all FAT16 volumes to FAT32 volumes when the destination
partition to convert is larger than 256 MB in size. Ensure that the installed operating
systems can access the volumes that will be converted to support FAT32.
-f64
Lets Norton Ghost resize FAT16 partitions to be larger than 2047 MB using 64 K clusters.
This is only supported by Windows NT and Windows 2000. Do not use on computers
with other operating systems
-fatlimit
Limits the size of FAT16 partitions to 2047 MB. Useful when Windows NT FAT16
partitions are present on the disk and 64 K clusters are not wanted
-fcr
Creates a CRC32 file, Ghost.crc, while creating an image file.
See “-CRC32 switch usage” on page 172.
-fdsp
Preserves the signature bytes on the destination disk when performing a disk-to-disk or
image-to-disk cloning operation
-fdsz
Clears the signature bytes on the destination disk when performing a disk-to-disk or
image-to-disk cloning operation.
-femax
When an extended partition is created in a disk-to-disk or image-to-disk operation, the
femax switch ensures that the extended partition takes up all free space.
-ffatid
Forces the FAT partition id. This switch changes the partition id to the recommended
partition id for the FAT partition within the destination image file or the destination
partition table. This switch only takes effect if the source is a disk or partition, not an
image file.
For example, if you are cloning a partition of type 0xA0 (some unknown partition id), and
Norton Ghost sees it as a valid FATx (FAT12/FAT16/FAT32) partition, then the partition id
is changed from 0xA0 to FATx.
This was default Norton Ghost behavior before Symantec Ghost 7.5. This switch allows
for backward compatibility.
-ffi
Prefers the use of direct IDE access for IDE hard disk operations. This switch does not
have any effect when running Norton Ghost in Windows 98.
-ffs
Prefers the use of direct ASPI/SCSI disk access for SCSI hard disk operations.
-ffx
Prefers the use of Extended Interrupt 13h disk access for hard disk operations.
-finger
Shows the fingerprint details written on a hard disk created by Norton Ghost. The
fingerprint details include the process used to create the disk or partition and the time,
date, and disk on which the operation was performed.
-fis
Uses all available disk space when creating partitions. By default, Norton Ghost often
leaves a small amount of free space at the end of the disk. Because partitions must be
aligned to cylinder boundaries, Norton Ghost may leave up to 5 MB free even when -fis is
specified.
-fni
Disables direct IDE access support for IDE hard disk operations.
This switch has the same functionality as the -noide switch.
-fns
Disables direct ASPI/SCSI access support for SCSI hard disk operations.
This switch has the same functionality as the -noscsi switch.
-fnx
Disables extended INT13 support for hard disk operations.
-fro
Forces Norton Ghost to continue cloning even if the source contains bad clusters.
-fx
Causes Norton Ghost to exit to DOS after operation completion. By default, Norton Ghost
prompts the user to restart or exit when the operation has finished. If Norton Ghost is run
as part of a batch file, it is sometimes useful to exit back to the DOS prompt after
completion so that further batch commands can be processed.
-ghostoncd
Includes Ghost.exe on a CD/DVD when writing an image to a CD/DVD.
-h or -? or -help Shows the Norton Ghost command-line switch Help page.
-ia The image all switch forces Norton Ghost to perform a sector-by-sector copy of all
partitions. When copying a partition from a disk to an image file or to another disk,
Norton Ghost examines the source partition and decides whether to copy just the files and
directory structure, or to do a sector-by-sector copy. If it understands the internal format
of the partition, it defaults to copying the files and directory structure. Generally this is the
best option. However, if a disk has been set up with special hidden security files that are in
specific positions on the partition, the only way to reproduce them accurately on the
target partition is through a sector-by-sector copy. If you use this switch to create an
image of a dynamic disk, then the image must be restored to a disk with identical
geometry.
-ial
Forces a sector-by-sector copy of Linux partitions. Other partitions are copied as normal.
-ib
The image boot switch copies the entire boot track, including the boot sector, when
creating a disk image file or copying disk-to-disk. Use this switch when installed
applications, such as boot-time utilities, use the boot track to store information. By
default, Norton Ghost copies only the boot sector, and does not copy the remainder of the
boot track. You cannot perform partition-to-partition or partition-to-image functions
with the -ib switch.
-id
The image disk switch is similar to -ia (image all), but also copies the boot track, as in -ib
(image boot), extended partition tables, and unpartitioned space on the disk. When
looking at an image with -id, you see the unpartitioned space and extended partitions in
the list of partitions. The -id switch is primarily used by law enforcement agencies that
require forensic images.
When Norton Ghost restores from an -id image, it relocates partitions to cylinder
boundaries and adjusts partition tables accordingly. Head, sector, and cylinder
information in partition tables is adjusted to match the geometry of the destination disk.
Partitions are not resizeable. You will need an identical or larger disk than the original.
Norton Ghost does not wipe the destination disk when restoring from an -id image.
Geometry differences between disks may leave tracks on the destination disk with their
previous contents.
Use the -ia (image all) switch instead of the -id switch when copying partition-to-partition
or partition-to-image. An individual partition can be restored from an image created with
-id.
-imgdesc
Adds a single-line image file description to the image file. This has the following
restrictions:
■ Cannot include any new lines
■ Cannot be used with -imgdescfile
■ Must be used with the clone switch
■ Clone switch mode must be create, dump, prcreate, or pdump
-imgdescfile
Specifies a text file that contains an image file description to be added to the image file.
This has the following restrictions:
■ Cannot be used with -imgdesc
■ Must be used with the clone switch
■ Clone switch mode must be create, dump, prcreate, or pdump
-ir
The image raw switch copies the entire disk, ignoring the partition table. This is useful
when a disk does not contain a partition table in the standard PC format, or you do not
want partitions to be realigned to track boundaries on the destination disk. Some
operating systems may not be able to access unaligned partitions. Partitions cannot be
resized during restore and you need an identical or larger disk.
-jl:x=filename Creates a log file to assist in diagnosing problems with TCP/IP connections. The amount of information logged is set by the log level, x. The log level x can be E (errors), S
(statistics), W (warnings), I (information), or A (all), in increasing order of logging detail.
The file name indicates the path and file name of the log to be created. In general, the error
and statistic levels do not affect session performance. All other levels may reduce
performance and should be used for diagnostic purposes only.
-lockinfo
Shows the type code and information stored in the BIOS or the Pentium III Processor ID.
For example:
160 Command-line switches
Command-line switches
Type Based On Value
M Manufacturer Compaq
P Product name Deskpro EN Series SFF
V Version Award Software
S Serial number H925CKH60020
U UUID 2DA9379B4707D31185E8C800A4F232BC
C M&P combined Compaq Deskpro EN Series SFF
I PIII ID 0000067200028E72A6994A20
-locktype=
Type Lets you lock an image file for use with a specific set of computers defined by the type
chosen and the source computer.
For example, ghost -locktype=P creates an image that can be used only on systems that
have the same product name type as the source computer.
-lpm
The LPT master mode switch causes Norton Ghost to automatically go into LPT master
mode, and is the equivalent of selecting LPT Master from the main menu.
-lps
The LPT slave mode switch causes Norton Ghost to automatically go into LPT slave mode,
and is the equivalent of selecting LPT Slave from the main menu.
-memcheck
Activates internal memory usage checking for Technical Support.
-noauto
Disables the automatic naming of spanned image files during creation. The user is
prompted for confirmation of the next destination location for the remainder of the image
file that is being restored.
-noautoskip
Includes the hibernation and skip files in the image file. These files are excluded by
default.See “Hibernation and swap files” on page 69.
-nofile
Disables the Image File Selection dialog box. Useful when opening directories with large
numbers of files and slow links.
-noide
Disables access to IDE devices.
-noindex
Prevents Norton Ghost from creating an index when creating an image file. This slightly
reduces the size of the image file and saves memory but Ghost Explorer is much slower in
reading the image file. This switch is useful if you are saving an image file from a large disk
with very little memory.
-nolilo
Does not attempt to patch the LILO boot loader after a clone. If you use the -nolilo switch,
you need to start from a floppy disk after the clone and then run /sbin/lilo as the root user
to reinstall LILO.
-noscsi
Disables access to SCSI devices using ASPI.
-ntc-
Disables NTFS contiguous run allocation.
-ntchkdsk
Sets the CHKDSK bit set on a copied NTFS volume. This causes Windows NT to check the
integrity of the volume when it is started.
-ntd
Enables NTFS internal diagnostic checking.
-ntic
Ignores the NTFS volume CHKDSK bit. Norton Ghost checks the CHKDSK bit on an
NTFS volume before performing operations. When Norton Ghost indicates that the
CHDSK bit is set, you should run CHKDSK on the volume to ensure that the disk is in a
sound state before cloning.
-ntiid
By default, Norton Ghost copies partitions participating in an Windows NT volume set,
stripe set, or mirror set using image all sector-by-sector copying. This switch forces Norton
Ghost to ignore the Windows NT volume set partition status and image the partition as if
it were an NTFS partition to let it be intelligently imaged on a file-by-file basis. Take care
when using this switch. Do not use the -ntiid switch with volume sets and stripe sets.
To clone mirrored partitions (also known as Windows NT software RAID partitions)
1 With Windows NT disk administrator, break the mirror set.
2 Using the -ntiid switch, clone one of the mirror partitions.
3 Resize as desired. Partitions can only be resized by Norton Ghost during a disk
operation. When performing a partition operation, the target partition size must
already be established.
4 After cloning, recreate the mirror set using the Windows NT disk administrator. The
disk administrator creates the partitions in the mirror set.
-ntil
Ignores NTFS log file check (inconsistent volume).
-or
The override switch allows the override of internal space and integrity checks and lets you
put a very big image into a small partition. The operation fails if it is unable to write to the
limited partition size. This switch lets you override spanning, which fails if there is limited
space. Avoid using this switch.
-pmbr
Specifies that the master boot record of the destination disk is to be preserved when
performing a disk-to-disk or image-to-disk cloning operation.
-pwd and -pwd=x Specifies that password protection be used when creating an image file.
x indicates the password for the image file. If no password is given in the switch, Norton
Ghost prompts for one. You can enter a maximum of 10 alphanumeric characters.
-quiet
The quiet mode switch disables status updates and user intervention.
-rb
Restarts after finishing a restore or copy. After completing a restore or copy operation, the
target computer must be restarted so that the operating system can restore the new disk/
partition information. Normally, Norton Ghost prompts the user to restart or exit. -rb tells
Norton Ghost to restart automatically after it completes the restore or copy. This is useful
when automating Norton Ghost in a batch command file.
-script
Allows you to specify a series of commands (one per line) that Norton Ghost will execute
in sequential order.
For example:
ghost -script=script.txt
Following is an example of script.txt:
-clone,mode=create,src=2,dst=c:\drv2.gho
-chkimg,c:\drv2.gho
-clone,mode=create,src=2,dst=c:\part2.gho
-chkimg,c:\part2.gho
-skip=x
The skip file switch causes Norton Ghost to exclude the indicated files during a create or
restore operation. A skip entry can specify a single file, a directory, or multiple files using
the * wildcard. File names must be given in short file name format and all path names are
absolute. Only FAT system files can be skipped. It is not possible to skip files on NTFS or
other file systems. The skip switch may only be included in the command line once. To
specify multiple skip entries, they must be included in a text file indicated using
-skip=@skipfile. The format of the skip text file, skipfile, matches the format used with the
CRC32 vexcept option.
For example:
■ -skip=\windows\user.dll
Skips the file User.dll in the Windows directory.
■ -skip=*\readme.txt
Skips any file called Readme.txt in any directory.
■ -skip=\ghost\*.dll
Skips any file ending with .dll in the Ghost directory.
■ -skip=\progra~1\
Skips the program files directory (note the short file name).
■ -skip=@skipfile.txt
Skips files as outlined in Skipfile.txt. For example, if Skipfile.txt contains:
*\*.tmt
[partition:1]
\windows\
*\*.exe
[Partition:2]
*\*me.txt
This would skip all *.tmt files on any partition, the Windows directory, all *.exe files
on the first partition, and any file that ends with me.txt on the second partition.
-span Enables spanning of image files across volumes.
Do not use this switch if you are running Ghost.exe to write an image file directly to a CDR/
RW. Ghost.exe automatically spans CD-R/RW disks if required.
-split=
x Splits image file into x MB spans. Use this switch to create a forced-size volume set. For
example, if you want to force smaller image files from a 1024 MB drive, you could specify
200 MB segments.
For example:
ghost.exe -split=200
This divides the image into 200 MB segments.
-sure Use the -sure switch in conjunction with -clone to avoid being prompted with the final
question “Proceed with disk clone - destination drive will be overwritten?” This command
is useful in batch mode.
-sze
Sets the size for the destination partitions for either a disk restore or disk copy operation.
When numbering partitions in the -sze switch, do not include the hidden Ghost partition.
-szee
Forces Norton Ghost to keep the sizes of all destination partitions the same as in the source
partition (no resizing).
-szef
Forces Norton Ghost to keep the sizes of all destination partitions, except for the first one,
the same as in the source partition. The first partition uses the remaining disk space.
This switch can be used with or without the -clone switch.
-szel
Forces Norton Ghost to keep the sizes of all destination partitions, except for the last one,
the same as in the source partition. The last partition uses the remaining disk space.
This switch can be used with or without the -clone switch.
-tapebuffered
Default tape mode. Sets the ASPI driver to report a read/write as successful as soon as the
data has been transferred to memory. Useful when using older or unreliable tape devices or
sequential media.
-tapeeject
Forces Norton Ghost to eject the tape following a tape operation. If the tape drive does not
support remote ejection you must eject and insert the tape manually before further use.
Earlier versions ejected the tape by default. By default, Norton Ghost does not eject the
tape. It rewinds the tape before exiting to DOS.
-tapesafe
Sets the ASPI driver to report a read/write as successful only when the data has been
transferred to the physical medium. Useful when using older or unreliable tape devices or
sequential media.
-tapebsize=x
Specifies the tape block size in units of 512 bytes, where x is 1 to 128.
-tapespeed=x
Allows control of tape speed, where x is 0 to F. 0 is the default. 1 to F increase tape speed.
Only use this when the tape does not work correctly at the speed used by Norton Ghost.
-tapeunbuffered
Sets the ASPI driver to report a read/write as successful only when the data has been
transferred to the tape drive. (It is possible that this occurs before the data is physically
written to the medium.)
-tcpm[:slave IP address]
The TCP/IP master mode switch causes Norton Ghost to go into TCP/IP master mode
automatically, and is the equivalent of selecting TCP/IP Master from the main menu. The
IP address of the slave computer may be specified.
-tcps
The TCP/IP slave mode switch causes Norton Ghost to go into TCP/IP slave mode
automatically, and is the equivalent of selecting TCP/IP Slave from the main menu.
See “Peer-to-peer connections” on page 178.
-usbm
The USB master mode switch causes Norton Ghost to go into USB master mode
automatically, and is the equivalent of selecting USB Master from the main menu. This
switch should precede the -clone switch. For example,
ghost.exe -usbm -clone,mode=dump,src=1,dst=1:1\image.gho
-usbs
The USB slave mode switch causes Norton Ghost to go into USB slave mode automatically,
and is the equivalent of selecting USB Slave from the main menu. This switch should
precede the -clone switch. See “Peer-to-peer connections” on page 178.
-vdw
If this switch is set, Norton Ghost uses the disk’s verify command to check every sector on
the disk before it is written. This option may slow Norton Ghost operation substantially.
-ver
Shows the version number of Norton Ghost.
-z
Runs compression when saving a disk or partition to an image file. The greater the
compression, the slower the transmission.
■ -z or -z1: Low compression (fast transmission)
■ -z2: High compression (medium transmission)
■ -z3 through -z9: Higher compression (slower transmission)
-
Continution of Supported configurations
Norton Ghost copies or clones any x86-based Linux system with full support for
Ext2/3 file systems (type 0x83) containing 1 KB, 2 KB, or 4 KB block sizes. Other
file systems, such as reiserfs, are cloned on a sector-by-sector basis and cannot be
resized during cloning.
Linux systems that use LILO as their boot loader in the MBR or in the active
Ext2/3 partition are supported with some exceptions. Any references to a disk
other than the first hard disk in the system (/dev/hda or /dev/sda) are not
supported. The /boot and root file systems must be on the first hard disk. /boot
can be a directory within the root file system.
Norton Ghost supports type 0 and type 1 Linux swap file systems (type 0x82).
Norton Ghost partially supports Linux extended partitions (type 0x85). It copies file systems inside these extended partitions, but restores them as DOS extended partitions. This is not known to cause problems with Linux systems after cloning.
Position of disk
Linux is sensitive to the position of the disk in hardware. A system running on the
primary master disk does not run if the disk is mounted as the primary slave or as
the secondary master. Norton Ghost does not resolve this issue.
Boot configuration
Norton Ghost uses the file /etc/lilo.conf to determine the boot configuration. If
this file does not match the boot configuration, Norton Ghost may be unable to
patch LILO during cloning. The keyword, default, is not supported in Lilo.conf,
so the first target specified should be the default target.
If a different boot loader, such as grub, is used, or the preceding conditions are
not met, Norton Ghost clones the system but the new disk probably will not boot.
The system should be started from a floppy disk or CD, and the boot loader
should be reinstalled by running /sbin/lilo or an equivalent.
Warning: Always have a boot disk available in case of problems starting a Linux
system after cloning.
Norton Ghost utility support
Ghost Explorer substantially supports Ext2/3 file systems within image files,
including the restoration, deletion, and addition of files within these file systems.
Problems arise when files that have names that are illegal on Windows are
manipulated. Ghost Explorer cannot manipulate device files or symbolic links.
Sparse files are expanded on restoration, and hard links are broken.
GDisk does not create any Linux file systems or recognize any partitions within a
Linux extended partition.
Disclimar :
These are the tips taken from the Symentec and work with your own risk.
This chapter includes the following topics:
■ Supported configurations
■ Position of disk
■ Boot configuration
■ Norton Ghost utility support
Supported configurations
Norton Ghost can copy or clone many different Linux distributions successfully.
However, Norton Ghost is sensitive to any possible changes in Ext2/3 file system
and LILO specifications. If changes are made to these specifications, Norton
Ghost may no longer support the Linux distribution. Symantec attempts to
release new builds of Ghost promptly to address such changes.
Norton Ghost is not sensitive to kernel versions. Use the -ial and -nolilo
command-line switches to resolve problems with any incompatibilities.
What is Command- line switches
Command-line switches
Using Norton Ghost with swtches
Norton Ghost can be run in the following ways:
■ Interactively with no command-line switches
■ Interactively with selected switches
■ Automated in batch files (batch mode)
The Norton Ghost command-line switches are used to alter Norton Ghost
behavior and automate procedures.
If you are adding switches from the Advanced Options dialog box, some of these
switches, for example, the -clone switch, are not applicable to your task. Because
you are already performing a backup, restore, or clone operation, the -clone
switch is redundant.
To list Norton Ghost command-line switches
◆ In the Ghost directory, type one of the following:
■ ghost.exe -h
■ ghost.exe -?
A hyphen (-) or a slash (/) must precede all switches except @. Switches are not
case sensitive. They can be entered in upper, lower, or mixed case.
Command-line switches
@filename
Specifies a file that contains additional command-line switches that Norton Ghost should
read. Filename indicates the path and file name of the command-line switch file. The
command-line switch file can include any Norton Ghost command-line switch, except for
-afile and -dfile. The Norton Ghost command-line switch file must be a text file with each
switch on a separate line. This feature lets you exceed the DOS command-line limit of 150
characters.
For example, for the following command line:
ghost.exe @ghswitch.txt
The file Ghswitch.txt would read:
-clone,mode=pcreate,src=1:2,dst=g:\part2.gho
-fcr
-sure
-afile=filename Replaces the default abort error log file name, Ghosterr.txt, with the
directory and file given in filename.
-auto Automatically names spanned image files during creation. Using this switch avoids the
user prompt that asks for confirmation of the next destination location for the remainder
of the image file that is being loaded. This switch is the default behavior for Norton Ghost.
-batch Batch mode switch. Prevents abort messages from waiting for user
acknowledgment, and removes user interaction prompts. The return value of Ghost.exe
must be checked to identify whether the operation was successful. Norton Ghost returns 0
on success and 1 or higher on failure or error.
-bfc Handles bad FAT clusters when writing to disk. If this switch is set, and the target
partition is FAT, Norton Ghost checks for and works around bad sectors. This option may
slow Norton Ghost operation substantially.
-bootcd When writing an image directly to a CD/DVD writer, makes the CD/DVD bootable. You
need a bootable floppy disk in drive A. If you use the -sure switch with -bootcd, and a
floppy disk is not in drive A, then a non-bootable CD/DVD is created.
-buffersize=x Ghost creates an image file using a small buffer where x = number of KB. The size
of the buffer is automatically calculated by Norton Ghost. The buffersize switch lets you
override this size. You can set the buffer size value from 1 to 32.
-chkimg,filename Checks the integrity of the image file indicated by filename.
-clone Ghost.exe operation switch. This switch allows automation of Ghost.exe operations and
has a series of arguments that define the operation parameters.
See “Clone switch usage” on page 166.
-cns Reverts the naming of spanned files to the system used by versions of Norton Ghost prior
to Symantec Ghost 6.5. If this switch is not used, then the naming of spanned files
conforms to Microsoft application guidelines. You do not need to use this switch when
reading an existing file. Use this switch when the first five characters in a file name must be
unique. For example:
With -cns Without -cns
Filename.gho Filename.gho
Filename.001 Filen001.ghs
Filename.002 Filen002.ghs
-CRC32
The -CRC32 switch lets you make a list of the files on a disk or partition or create an
image file with CRC values and then verify the list against the original or a copy. The
purpose is to allow both quick listing of the contents of an image file and verification that
a disk created by Norton Ghost contains the same files as the original.
-crcignore
Ignores CRC errors. CRC errors indicate data corruption. This switch overrides the CRC
error detection and may let a corrupted image file be used. Using this switch leaves the
corrupted files in an unknown state. You can use this switch to help you extract files from
a corrupted image file.
-cvtarea
Creates a file, Cvtarea.tmp, that is the location of the MFT when the FAT32 partition is
converted to NTFS. This switch operates in a similar manner to the cvtarea program that
Microsoft provides in Deploy.cab on the Windows XP installation CD.
For more information, see the Microsoft Web site:
http://www.microsoft.com/hwdev/tech/storage/ntfs-preinstall.asp
The file is created in the root directory of the partition during a partition or disk restore
and is created as a contiguous space on the disk. The largest size allowed is 4 GB. If the file
is larger than this, it is truncated to 4 GB.
The syntax for this switch is as follows:
-cvtarea,
filename=xxx,size=yyy{%disk,%free,KB,MB,GB},
firstcluster=zzz{%disk,%free,KB,MB,GB}
filename cvtarea.tmp
size 12%disk
firstcluster 1|3 GB|33%disk
Defaults to:
■ 1/3 of the partition size if the partition size is less than 2 GB
■ 1 GB if the partition size is less than 6 GB
■ 3 GB if the partition size is equal to or greater than 6 GB
-dd
Dumps disk metrics information to the dump log file, Ghststat.txt. The file location can be
altered using the -dfile=filename switch.
-dfile=filename Changes the path and file name of the dump log file created using the -dd switch.
This switch cannot be included in the @ Ghost switch text file
Command-line switches 157
Command-line switches
-dl=number Specifies the number of hard disks present. Valid numbers are between 1 and 8. This may help when the BIOS does not report the number of drives correctly.
-dlist=drives Specifies a list of drives to search for span files. If a span file cannot be found, then the drive letters in dlist are substituted one by one to look for the file on other drives.
For example, the command ghost -dlist=CDEFG instructs Norton Ghost to look for files
on C, D, E, F, and G drives. The path remains the same.
-f32
Lets Norton Ghost convert all FAT16 volumes to FAT32 volumes when the destination
partition to convert is larger than 256 MB in size. Ensure that the installed operating
systems can access the volumes that will be converted to support FAT32.
-f64
Lets Norton Ghost resize FAT16 partitions to be larger than 2047 MB using 64 K clusters.
This is only supported by Windows NT and Windows 2000. Do not use on computers
with other operating systems
-fatlimit
Limits the size of FAT16 partitions to 2047 MB. Useful when Windows NT FAT16
partitions are present on the disk and 64 K clusters are not wanted
-fcr
Creates a CRC32 file, Ghost.crc, while creating an image file.
See “-CRC32 switch usage” on page 172.
-fdsp
Preserves the signature bytes on the destination disk when performing a disk-to-disk or
image-to-disk cloning operation
-fdsz
Clears the signature bytes on the destination disk when performing a disk-to-disk or
image-to-disk cloning operation.
-femax
When an extended partition is created in a disk-to-disk or image-to-disk operation, the
femax switch ensures that the extended partition takes up all free space.
-ffatid
Forces the FAT partition id. This switch changes the partition id to the recommended
partition id for the FAT partition within the destination image file or the destination
partition table. This switch only takes effect if the source is a disk or partition, not an
image file.
For example, if you are cloning a partition of type 0xA0 (some unknown partition id), and
Norton Ghost sees it as a valid FATx (FAT12/FAT16/FAT32) partition, then the partition id
is changed from 0xA0 to FATx.
This was default Norton Ghost behavior before Symantec Ghost 7.5. This switch allows
for backward compatibility.
-ffi
Prefers the use of direct IDE access for IDE hard disk operations. This switch does not
have any effect when running Norton Ghost in Windows 98.
-ffs
Prefers the use of direct ASPI/SCSI disk access for SCSI hard disk operations.
-ffx
Prefers the use of Extended Interrupt 13h disk access for hard disk operations.
-finger
Shows the fingerprint details written on a hard disk created by Norton Ghost. The
fingerprint details include the process used to create the disk or partition and the time,
date, and disk on which the operation was performed.
-fis
Uses all available disk space when creating partitions. By default, Norton Ghost often
leaves a small amount of free space at the end of the disk. Because partitions must be
aligned to cylinder boundaries, Norton Ghost may leave up to 5 MB free even when -fis is
specified.
-fni
Disables direct IDE access support for IDE hard disk operations.
This switch has the same functionality as the -noide switch.
-fns
Disables direct ASPI/SCSI access support for SCSI hard disk operations.
This switch has the same functionality as the -noscsi switch.
-fnx
Disables extended INT13 support for hard disk operations.
-fro
Forces Norton Ghost to continue cloning even if the source contains bad clusters.
-fx
Causes Norton Ghost to exit to DOS after operation completion. By default, Norton Ghost
prompts the user to restart or exit when the operation has finished. If Norton Ghost is run
as part of a batch file, it is sometimes useful to exit back to the DOS prompt after
completion so that further batch commands can be processed.
-ghostoncd
Includes Ghost.exe on a CD/DVD when writing an image to a CD/DVD.
-h or -? or -help Shows the Norton Ghost command-line switch Help page.
-ia The image all switch forces Norton Ghost to perform a sector-by-sector copy of all
partitions. When copying a partition from a disk to an image file or to another disk,
Norton Ghost examines the source partition and decides whether to copy just the files and
directory structure, or to do a sector-by-sector copy. If it understands the internal format
of the partition, it defaults to copying the files and directory structure. Generally this is the
best option. However, if a disk has been set up with special hidden security files that are in
specific positions on the partition, the only way to reproduce them accurately on the
target partition is through a sector-by-sector copy. If you use this switch to create an
image of a dynamic disk, then the image must be restored to a disk with identical
geometry.
-ial
Forces a sector-by-sector copy of Linux partitions. Other partitions are copied as normal.
-ib
The image boot switch copies the entire boot track, including the boot sector, when
creating a disk image file or copying disk-to-disk. Use this switch when installed
applications, such as boot-time utilities, use the boot track to store information. By
default, Norton Ghost copies only the boot sector, and does not copy the remainder of the
boot track. You cannot perform partition-to-partition or partition-to-image functions
with the -ib switch.
-id
The image disk switch is similar to -ia (image all), but also copies the boot track, as in -ib
(image boot), extended partition tables, and unpartitioned space on the disk. When
looking at an image with -id, you see the unpartitioned space and extended partitions in
the list of partitions. The -id switch is primarily used by law enforcement agencies that
require forensic images.
When Norton Ghost restores from an -id image, it relocates partitions to cylinder
boundaries and adjusts partition tables accordingly. Head, sector, and cylinder
information in partition tables is adjusted to match the geometry of the destination disk.
Partitions are not resizeable. You will need an identical or larger disk than the original.
Norton Ghost does not wipe the destination disk when restoring from an -id image.
Geometry differences between disks may leave tracks on the destination disk with their
previous contents.
Use the -ia (image all) switch instead of the -id switch when copying partition-to-partition
or partition-to-image. An individual partition can be restored from an image created with
-id.
-imgdesc
Adds a single-line image file description to the image file. This has the following
restrictions:
■ Cannot include any new lines
■ Cannot be used with -imgdescfile
■ Must be used with the clone switch
■ Clone switch mode must be create, dump, prcreate, or pdump
-imgdescfile
Specifies a text file that contains an image file description to be added to the image file.
This has the following restrictions:
■ Cannot be used with -imgdesc
■ Must be used with the clone switch
■ Clone switch mode must be create, dump, prcreate, or pdump
-ir
The image raw switch copies the entire disk, ignoring the partition table. This is useful
when a disk does not contain a partition table in the standard PC format, or you do not
want partitions to be realigned to track boundaries on the destination disk. Some
operating systems may not be able to access unaligned partitions. Partitions cannot be
resized during restore and you need an identical or larger disk.
-jl:x=filename Creates a log file to assist in diagnosing problems with TCP/IP connections. The amount of information logged is set by the log level, x. The log level x can be E (errors), S
(statistics), W (warnings), I (information), or A (all), in increasing order of logging detail.
The file name indicates the path and file name of the log to be created. In general, the error
and statistic levels do not affect session performance. All other levels may reduce
performance and should be used for diagnostic purposes only.
-lockinfo
Shows the type code and information stored in the BIOS or the Pentium III Processor ID.
For example:
160 Command-line switches
Command-line switches
Type Based On Value
M Manufacturer Compaq
P Product name Deskpro EN Series SFF
V Version Award Software
S Serial number H925CKH60020
U UUID 2DA9379B4707D31185E8C800A4F232BC
C M&P combined Compaq Deskpro EN Series SFF
I PIII ID 0000067200028E72A6994A20
-locktype=
Type Lets you lock an image file for use with a specific set of computers defined by the type
chosen and the source computer.
For example, ghost -locktype=P creates an image that can be used only on systems that
have the same product name type as the source computer.
-lpm
The LPT master mode switch causes Norton Ghost to automatically go into LPT master
mode, and is the equivalent of selecting LPT Master from the main menu.
-lps
The LPT slave mode switch causes Norton Ghost to automatically go into LPT slave mode,
and is the equivalent of selecting LPT Slave from the main menu.
-memcheck
Activates internal memory usage checking for Technical Support.
-noauto
Disables the automatic naming of spanned image files during creation. The user is
prompted for confirmation of the next destination location for the remainder of the image
file that is being restored.
-noautoskip
Includes the hibernation and skip files in the image file. These files are excluded by
default.See “Hibernation and swap files” on page 69.
-nofile
Disables the Image File Selection dialog box. Useful when opening directories with large
numbers of files and slow links.
-noide
Disables access to IDE devices.
-noindex
Prevents Norton Ghost from creating an index when creating an image file. This slightly
reduces the size of the image file and saves memory but Ghost Explorer is much slower in
reading the image file. This switch is useful if you are saving an image file from a large disk
with very little memory.
-nolilo
Does not attempt to patch the LILO boot loader after a clone. If you use the -nolilo switch,
you need to start from a floppy disk after the clone and then run /sbin/lilo as the root user
to reinstall LILO.
-noscsi
Disables access to SCSI devices using ASPI.
-ntc-
Disables NTFS contiguous run allocation.
-ntchkdsk
Sets the CHKDSK bit set on a copied NTFS volume. This causes Windows NT to check the
integrity of the volume when it is started.
-ntd
Enables NTFS internal diagnostic checking.
-ntic
Ignores the NTFS volume CHKDSK bit. Norton Ghost checks the CHKDSK bit on an
NTFS volume before performing operations. When Norton Ghost indicates that the
CHDSK bit is set, you should run CHKDSK on the volume to ensure that the disk is in a
sound state before cloning.
-ntiid
By default, Norton Ghost copies partitions participating in an Windows NT volume set,
stripe set, or mirror set using image all sector-by-sector copying. This switch forces Norton
Ghost to ignore the Windows NT volume set partition status and image the partition as if
it were an NTFS partition to let it be intelligently imaged on a file-by-file basis. Take care
when using this switch. Do not use the -ntiid switch with volume sets and stripe sets.
To clone mirrored partitions (also known as Windows NT software RAID partitions)
1 With Windows NT disk administrator, break the mirror set.
2 Using the -ntiid switch, clone one of the mirror partitions.
3 Resize as desired. Partitions can only be resized by Norton Ghost during a disk
operation. When performing a partition operation, the target partition size must
already be established.
4 After cloning, recreate the mirror set using the Windows NT disk administrator. The
disk administrator creates the partitions in the mirror set.
-ntil
Ignores NTFS log file check (inconsistent volume).
-or
The override switch allows the override of internal space and integrity checks and lets you
put a very big image into a small partition. The operation fails if it is unable to write to the
limited partition size. This switch lets you override spanning, which fails if there is limited
space. Avoid using this switch.
-pmbr
Specifies that the master boot record of the destination disk is to be preserved when
performing a disk-to-disk or image-to-disk cloning operation.
-pwd and -pwd=x Specifies that password protection be used when creating an image file.
x indicates the password for the image file. If no password is given in the switch, Norton
Ghost prompts for one. You can enter a maximum of 10 alphanumeric characters.
-quiet
The quiet mode switch disables status updates and user intervention.
-rb
Restarts after finishing a restore or copy. After completing a restore or copy operation, the
target computer must be restarted so that the operating system can restore the new disk/
partition information. Normally, Norton Ghost prompts the user to restart or exit. -rb tells
Norton Ghost to restart automatically after it completes the restore or copy. This is useful
when automating Norton Ghost in a batch command file.
-script
Allows you to specify a series of commands (one per line) that Norton Ghost will execute
in sequential order.
For example:
ghost -script=script.txt
Following is an example of script.txt:
-clone,mode=create,src=2,dst=c:\drv2.gho
-chkimg,c:\drv2.gho
-clone,mode=create,src=2,dst=c:\part2.gho
-chkimg,c:\part2.gho
-skip=x
The skip file switch causes Norton Ghost to exclude the indicated files during a create or
restore operation. A skip entry can specify a single file, a directory, or multiple files using
the * wildcard. File names must be given in short file name format and all path names are
absolute. Only FAT system files can be skipped. It is not possible to skip files on NTFS or
other file systems. The skip switch may only be included in the command line once. To
specify multiple skip entries, they must be included in a text file indicated using
-skip=@skipfile. The format of the skip text file, skipfile, matches the format used with the
CRC32 vexcept option.
For example:
■ -skip=\windows\user.dll
Skips the file User.dll in the Windows directory.
■ -skip=*\readme.txt
Skips any file called Readme.txt in any directory.
■ -skip=\ghost\*.dll
Skips any file ending with .dll in the Ghost directory.
■ -skip=\progra~1\
Skips the program files directory (note the short file name).
■ -skip=@skipfile.txt
Skips files as outlined in Skipfile.txt. For example, if Skipfile.txt contains:
*\*.tmt
[partition:1]
\windows\
*\*.exe
[Partition:2]
*\*me.txt
This would skip all *.tmt files on any partition, the Windows directory, all *.exe files
on the first partition, and any file that ends with me.txt on the second partition.
-span Enables spanning of image files across volumes.
Do not use this switch if you are running Ghost.exe to write an image file directly to a CDR/
RW. Ghost.exe automatically spans CD-R/RW disks if required.
-split=
x Splits image file into x MB spans. Use this switch to create a forced-size volume set. For
example, if you want to force smaller image files from a 1024 MB drive, you could specify
200 MB segments.
For example:
ghost.exe -split=200
This divides the image into 200 MB segments.
-sure Use the -sure switch in conjunction with -clone to avoid being prompted with the final
question “Proceed with disk clone - destination drive will be overwritten?” This command
is useful in batch mode.
-sze
Sets the size for the destination partitions for either a disk restore or disk copy operation.
When numbering partitions in the -sze switch, do not include the hidden Ghost partition.
-szee
Forces Norton Ghost to keep the sizes of all destination partitions the same as in the source
partition (no resizing).
-szef
Forces Norton Ghost to keep the sizes of all destination partitions, except for the first one,
the same as in the source partition. The first partition uses the remaining disk space.
This switch can be used with or without the -clone switch.
-szel
Forces Norton Ghost to keep the sizes of all destination partitions, except for the last one,
the same as in the source partition. The last partition uses the remaining disk space.
This switch can be used with or without the -clone switch.
-tapebuffered
Default tape mode. Sets the ASPI driver to report a read/write as successful as soon as the
data has been transferred to memory. Useful when using older or unreliable tape devices or
sequential media.
-tapeeject
Forces Norton Ghost to eject the tape following a tape operation. If the tape drive does not
support remote ejection you must eject and insert the tape manually before further use.
Earlier versions ejected the tape by default. By default, Norton Ghost does not eject the
tape. It rewinds the tape before exiting to DOS.
-tapesafe
Sets the ASPI driver to report a read/write as successful only when the data has been
transferred to the physical medium. Useful when using older or unreliable tape devices or
sequential media.
-tapebsize=x
Specifies the tape block size in units of 512 bytes, where x is 1 to 128.
-tapespeed=x
Allows control of tape speed, where x is 0 to F. 0 is the default. 1 to F increase tape speed.
Only use this when the tape does not work correctly at the speed used by Norton Ghost.
-tapeunbuffered
Sets the ASPI driver to report a read/write as successful only when the data has been
transferred to the tape drive. (It is possible that this occurs before the data is physically
written to the medium.)
-tcpm[:slave IP address]
The TCP/IP master mode switch causes Norton Ghost to go into TCP/IP master mode
automatically, and is the equivalent of selecting TCP/IP Master from the main menu. The
IP address of the slave computer may be specified.
-tcps
The TCP/IP slave mode switch causes Norton Ghost to go into TCP/IP slave mode
automatically, and is the equivalent of selecting TCP/IP Slave from the main menu.
See “Peer-to-peer connections” on page 178.
-usbm
The USB master mode switch causes Norton Ghost to go into USB master mode
automatically, and is the equivalent of selecting USB Master from the main menu. This
switch should precede the -clone switch. For example,
ghost.exe -usbm -clone,mode=dump,src=1,dst=1:1\image.gho
-usbs
The USB slave mode switch causes Norton Ghost to go into USB slave mode automatically,
and is the equivalent of selecting USB Slave from the main menu. This switch should
precede the -clone switch. See “Peer-to-peer connections” on page 178.
-vdw
If this switch is set, Norton Ghost uses the disk’s verify command to check every sector on
the disk before it is written. This option may slow Norton Ghost operation substantially.
-ver
Shows the version number of Norton Ghost.
-z
Runs compression when saving a disk or partition to an image file. The greater the
compression, the slower the transmission.
■ -z or -z1: Low compression (fast transmission)
■ -z2: High compression (medium transmission)
■ -z3 through -z9: Higher compression (slower transmission)
-
Continution of Supported configurations
Norton Ghost copies or clones any x86-based Linux system with full support for
Ext2/3 file systems (type 0x83) containing 1 KB, 2 KB, or 4 KB block sizes. Other
file systems, such as reiserfs, are cloned on a sector-by-sector basis and cannot be
resized during cloning.
Linux systems that use LILO as their boot loader in the MBR or in the active
Ext2/3 partition are supported with some exceptions. Any references to a disk
other than the first hard disk in the system (/dev/hda or /dev/sda) are not
supported. The /boot and root file systems must be on the first hard disk. /boot
can be a directory within the root file system.
Norton Ghost supports type 0 and type 1 Linux swap file systems (type 0x82).
Norton Ghost partially supports Linux extended partitions (type 0x85). It copies file systems inside these extended partitions, but restores them as DOS extended partitions. This is not known to cause problems with Linux systems after cloning.
Position of disk
Linux is sensitive to the position of the disk in hardware. A system running on the
primary master disk does not run if the disk is mounted as the primary slave or as
the secondary master. Norton Ghost does not resolve this issue.
Boot configuration
Norton Ghost uses the file /etc/lilo.conf to determine the boot configuration. If
this file does not match the boot configuration, Norton Ghost may be unable to
patch LILO during cloning. The keyword, default, is not supported in Lilo.conf,
so the first target specified should be the default target.
If a different boot loader, such as grub, is used, or the preceding conditions are
not met, Norton Ghost clones the system but the new disk probably will not boot.
The system should be started from a floppy disk or CD, and the boot loader
should be reinstalled by running /sbin/lilo or an equivalent.
Warning: Always have a boot disk available in case of problems starting a Linux
system after cloning.
Norton Ghost utility support
Ghost Explorer substantially supports Ext2/3 file systems within image files,
including the restoration, deletion, and addition of files within these file systems.
Problems arise when files that have names that are illegal on Windows are
manipulated. Ghost Explorer cannot manipulate device files or symbolic links.
Sparse files are expanded on restoration, and hard links are broken.
GDisk does not create any Linux file systems or recognize any partitions within a
Linux extended partition.
Disclimar :
These are the tips taken from the Symentec and work with your own risk.
Subscribe to:
Posts (Atom)


